Webex Meetings
Guest to Guest Quickstart
This tutorial provides step-by-step instructions to set up a Webex Service App that enables organizations to create and manage guest-to-guest meetings with unique join links for non-licensed users.
Webex Guest-to-Guest (G2G) Meetings apps are created to facilitate full-featured Webex meetings for non-licensed users, with a Webex Service App acting as the orchestrator. This approach offers flexibility by not requiring individual user licenses, instead allowing organizations to pay for simultaneous meeting sessions, making it ideal for scenarios where participants only need occasional access to Webex meetings. G2G meetings opens a variety of new application use cases, such as virtual consultations (e.g., doctor-patient, customer support), real-time expert assistance, and home care support, where participants are typically not permanently licensed Webex users.
This quickstart guide is a tutorial for developers who are just starting to get acclimated with creating and deploying G2G meetings apps. For full documentation on Guest-to-Guest Meetings Apps, please refer to the Guest to Guest Developer Guide.
Upon completion, you will be able to:
- Obtain a Developer Sandbox for Guest-to-Guest Meetings.
- Create a Webex Service App to facilitate a G2G Meetings demo.
- Request an admin to authorize the Service App.
- Act as the admin that authorizes the Service App in Control Hub.
- Retrieve an access token for the sample G2G Meetings app.
- Configure the G2G Meetings app with an access token and explore the sample Python code.
- Run the sample app to create and start a meeting between guest users.
We will be using a Python-based demo app that correlates to a variety of use cases where temporary, on-demand meeting access is needed for external participants. The app allows you to configure and start guest-only meetings, demonstrating how to generate unique host and guest join links. It also showcases the creation of guest identities, enabling non-licensed participants to easily access and join meetings.
anchorStep 1: Obtain and set up a Developer G2G Sandbox
anchorYou will first need to have administrator access to a Webex organization that is licensed for Guest-to-Meetings to complete this tutorial. The good news is that we offer developers a sandbox that provides all of this for free. Simply click the green “Request a Guest-to-Guest Sandbox” button on this page to have one assigned to a personal email address. When the sandbox has been provisioned, you will be sent administrator credentials that you can use to create and deploy the demo G2G app.
For this tutorial, and other use cases where a meeting “host” needs other participants to bypass the lobby and join the meeting directly, there some settings that should be configured in the G2G sandbox:
- Open a new browser tab and navigate to Webex Control Hub: admin.webex.com/login
- Log in to Control Hub with the sandbox admin credentials that you were assigned.
- Under Services, select “Meeting”.
- On the Meeting Sites page, select your sandbox org name.
- On the sandbox site page, select the “All” tab, then select “Security” from the drop-down menu.
- In the “Webex meeting security” section, make sure “Join meeting directly” is selected for both “how external invitees join meetings” and “how to manage people who aren't invited or aren't signed in when they attempt to join meetings”. These settings allow guests to use the
attendeeLinkto join and start the meeting even if they aren’t the host.
- Scroll down to the “Attendees” section and enable the option to “Allow attendees or panelists to join before host (Meetings, Training and Events)”. This allows any guest attendee to join the meeting without the host.

- Save the settings before exiting.
anchorStep 2: Create a Service App
anchorWebex G2G Meetings can only be facilitated through a Service App. Now that you have a sandbox set up, we can create the Service App. Here are the basic steps for creating one:
- In a new browser tab, log in to
developer.webex.comwith the admin credentials that were provided for your G2G Sandbox. Alternatively, you can create another user in your sandbox to be the developer. - Up on the top right corner of the page, click your avatar and then select ‘My Webex Apps’.
- On the ‘Create a New App’ page, find the Service App card and click the ‘Create a Service App’ button.

- Fill out the webform to register a new service app.
- App name: use something like “G2G Meetings Tutorial”.
- Icon: can be any selection.
- Description: “Testing a G2G Meetings App”
- Contact Email: Use the email from the account you logged in with.
- Scopes: Select the following scopes for the guest-to-guest sample app (use the browser’s “find” to quickly jump to each scope):
meeting:schedules_readmeeting:schedules_writeguest-meeting:rw
 5. Click the ‘Add Service App’ button to finish registration.
anchorStep 3: Request admin authorization
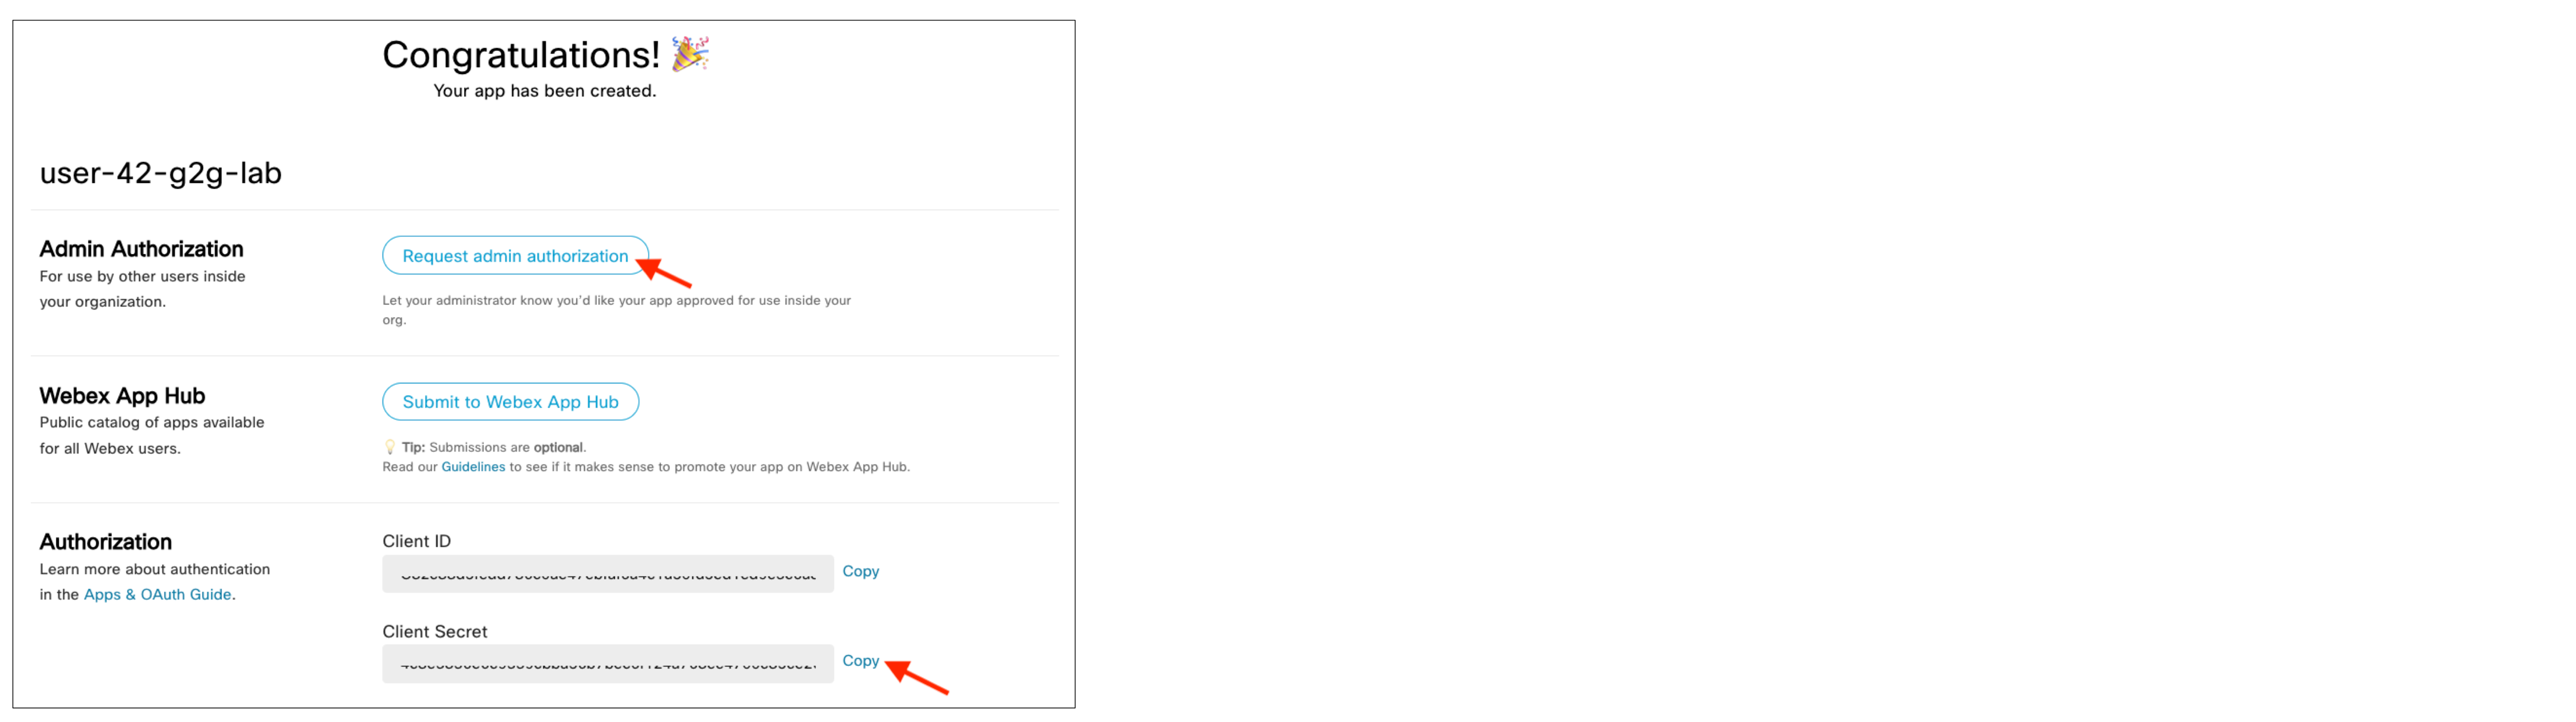
anchorAfter successfully registering the Service App, you are taken to a page that contains a Client ID and Client Secret. This is also where you request admin authorization for the Service App.
- Copy & paste the Client Secret value into a notepad for later use. Do note, this client secret is only shown once.
- Click the ‘Request admin authorization’ button and keep the browser tab open.
- In the next section, you will act as the administrator to authorize the app.
anchorStep 4: Authorize the G2G Service App in Control Hub
anchorAct as the Webex admin to authorize your own Service App in Control Hub.
- Go back to the Webex Control Hub site or open a new browser tab and navigate to:
admin.webex.com/login - Log in with the sandbox admin credentials that you were assigned.
- Inside Control Hub, under the Management section in the left menu, select Apps.
- Once on the Apps page, select the Service Apps tab.
- Find the Service App name you just created and click on it. This will open the description of the Service App.
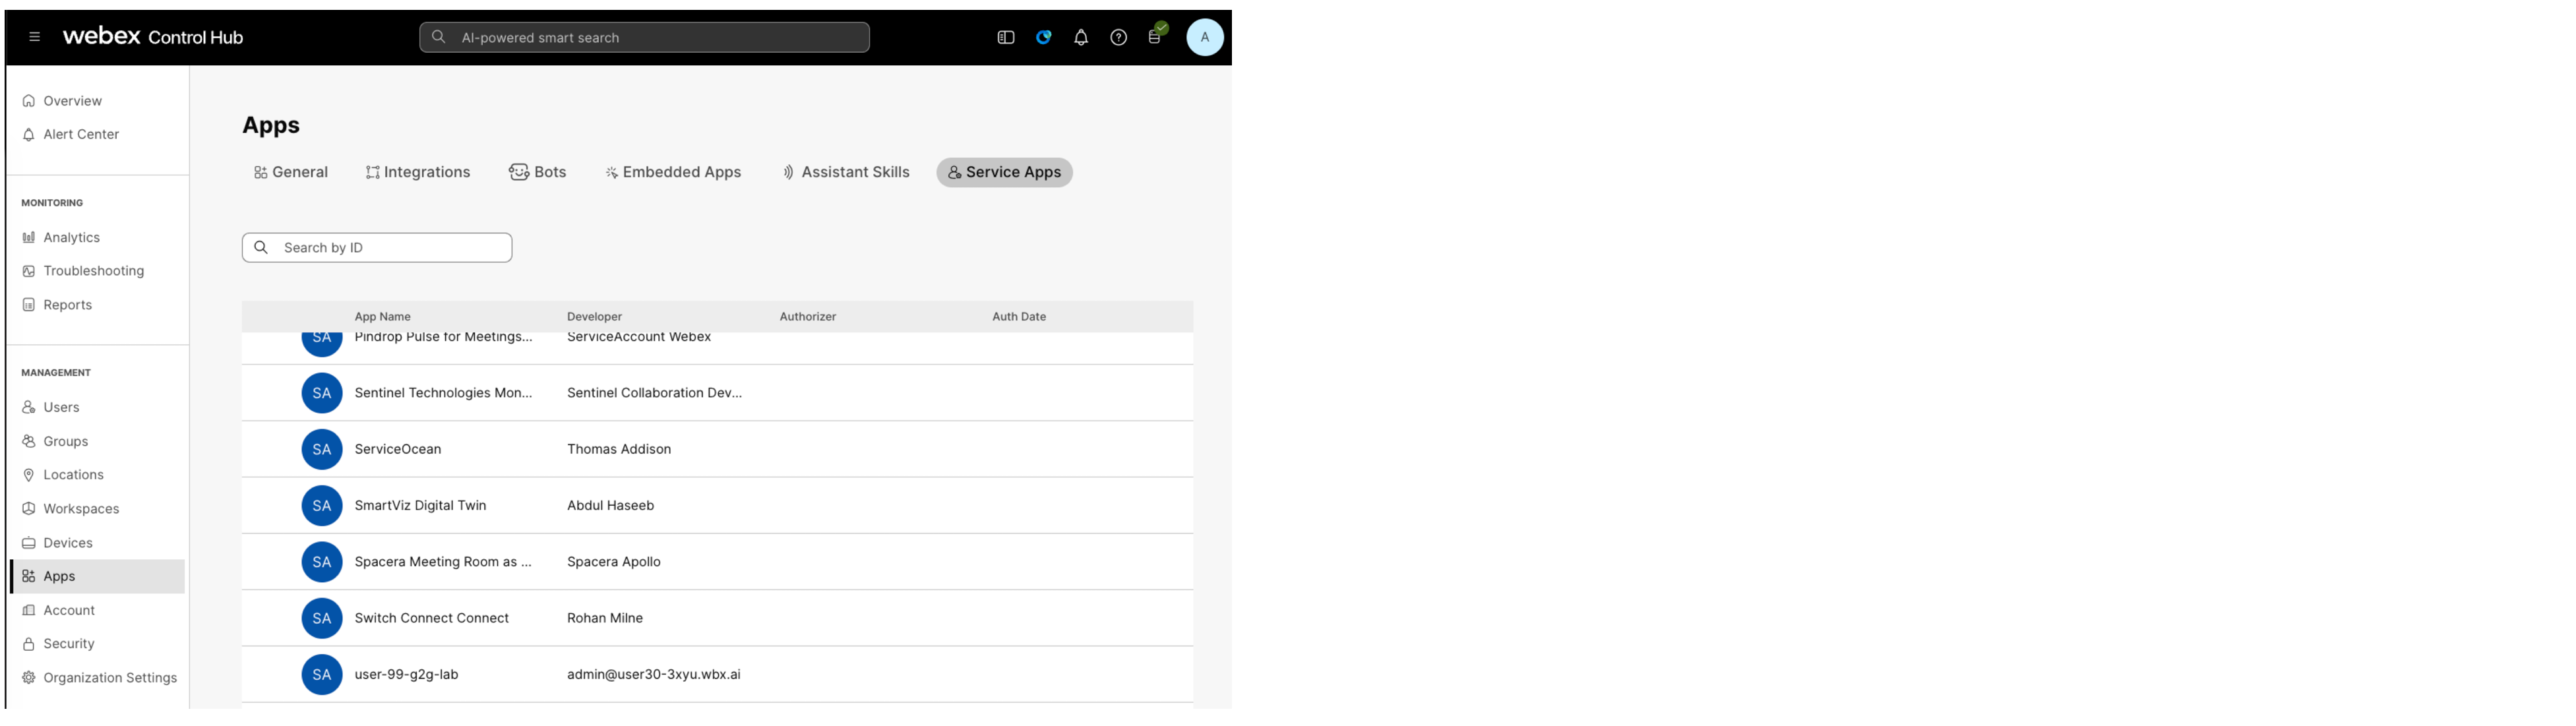
- In the Service App description window, click Authorize and then click Save. You will now see a green “Authorized” label next to the G2G app.

anchorStep 5: Retrieve the Access Token for the Service App
anchorAfter you authorize the Service App as the admin in Control Hub, you can retrieve the access token. Do note that only one (1) G2G enabled Service App can be authorized per organization, which is determined by the guest-meeting:rw scope.
- Go back to the browser tab that displays the Client ID and Client Secret and refresh the page.
- In the ‘Org Authorizations’ section, select the test org name from the dropdown menu.
- Paste in the Client Secret value from your notepad in the field below, then click the ‘Generate tokens’ button.

- Copy & paste the
access_tokenvalue in your notepad for later use. Token values are only shown one time.
anchorStep 6: Clone GitHub Repo to Install Python Demo App
anchorNow that the Service App is ready, it’s time to clone the G2G demo app. Be sure you have Python and pip installed on your machine.
- Clone this repo from GitHub:
https://github.com/WebexSamples/webex-g2g-app.git - Open a command line window and navigate to the
webex-g2g-appdirectory from the cloned repo. - Install the dependencies:
pip install -r requirements.txt - Open the
webex-g2g-appdirectory in a code editor.
anchorStep 7: Add the Access Token to the Demo App
anchor- In your code editor, open the
.env.samplefile. - Set the environment variable with the access token value you copied earlier by replacing the text in-between the quotes.
WEBEX_ACCESS_TOKEN='Qdjfufn4uf45_example' - Save the file.
- Rename the
.env.samplefile to.env
This is a good time to explore the webex.py and app.py files to get more familiarized with the app.
- The
webex.pyscript essentially defines how Webex API methods are structured. - The
app.pyscript passes in API data to the various endpoints, such as /meetings for creating the meeting, /guests/token for creating the guest identities, and /meetings/join for generating the meeting start & join link URLs.
anchorStep 8: Launch and use the G2G meetings demo app
anchorNow that the app is deployed and configured, let’s get it started.
- Go back to command line window in the
webex-g2g-appdirectory. - Launch the app using the following command:
flask run - If successful, you will see a response with a localhost URL like this:
Running on http://127.0.0.1:5000 - Next, open a browser tab and navigate to that localhost URL.
- You now should see the Guest-to-Guest Meeting Helper screen in the browser, which is where the meeting will be configured.
- Complete the steps as shown in the illustration below:
- (1) Type in any meeting title.
- (2) Use the default date & time that is auto filled. Also, if you select “Yes” for “Join Before Host”, it allows the “join link” to be used immediately without having to start the meeting first.
- (3) The Meeting Outcome section is read-only information.
- (4) Make two guest users.
- (6) Before starting the meeting, right-click and copy the “Join Meeting” link for the 2nd meeting guest to use after the meeting starts.
- (5) Click the Start Meeting link to launch the meeting in your browser.
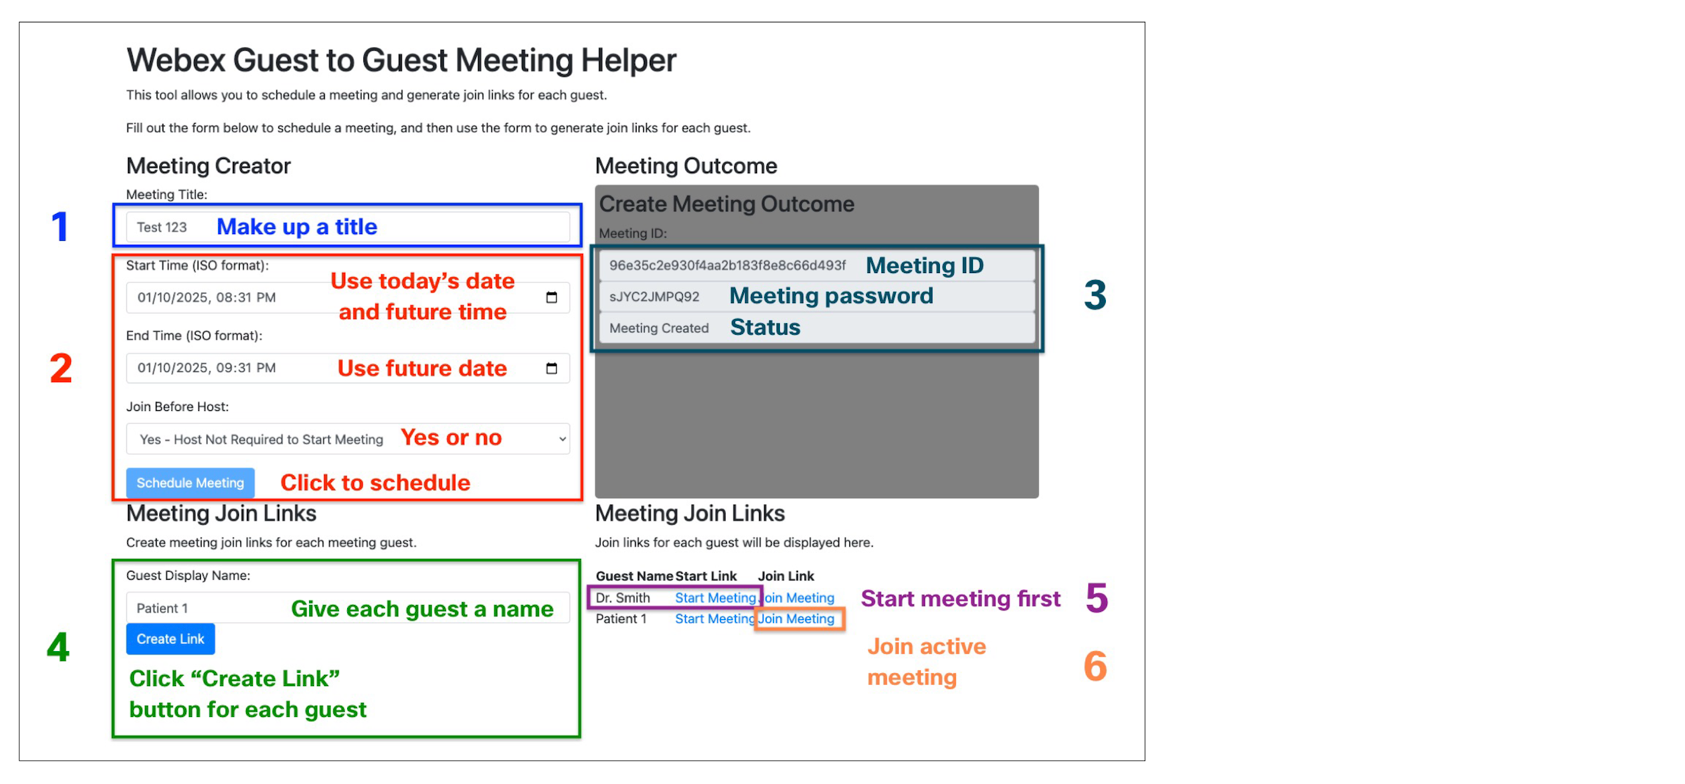
- To test a guest-only meeting scenario by yourself, open an incognito browser tab and paste the join link (6) URL in the address bar.
Finishing that last step with a guest-only meeting means you successfully completed this Quickstart Guide and gained hands-on experience with building a Webex G2G application. You've learned how to configure a G2G sandbox in Webex Control Hub, create and authorize a Service App with the required scopes for guest meetings, and retrieve the access token. Additionally, you've successfully deployed and configured a Python demo app that leveraged the Webex APIs to set up a meeting, create distinct guest identities, and generate the unique join links essential for non-licensed participants.