Webex Meetings
Screen Sharing
The Webex iOS Meetings SDK allows you to share the entire screen of your iOS mobile device during a call or meeting.
This article guides your through implementing screen sharing in your own iOS application.
anchorSet the App Group
anchorFor the screen sharing feature, the SDK uses the screen frame buffer from the iOS Broadcast Upload Extension. The only way to share data between your app and its extensions is by using an app group container.
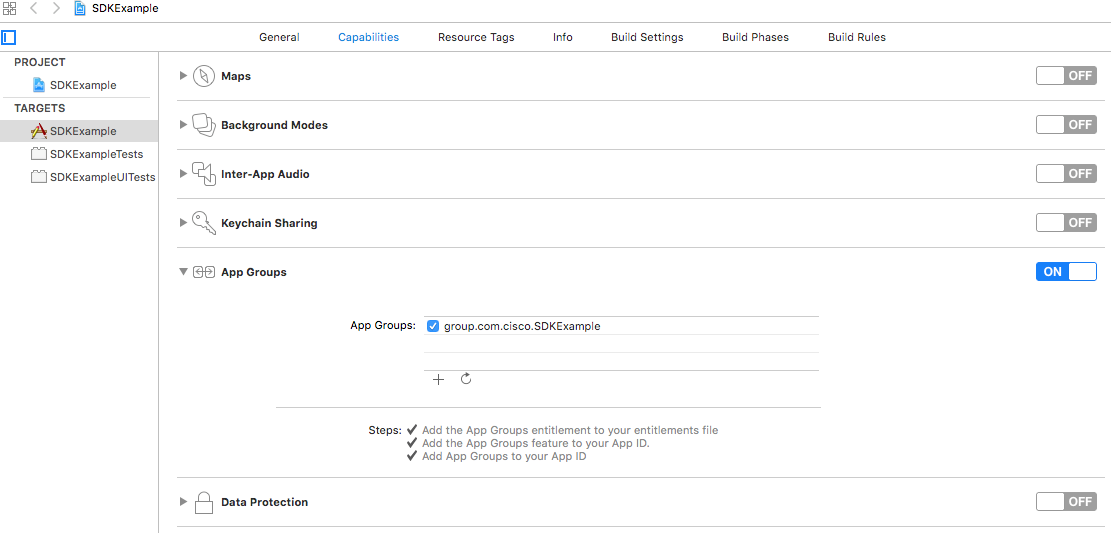
To enable an App Group in Xcode:
- Select your project file in Xcode.
- Open the Capabilities tab on the project target page.
- Enable the App Group capability and assign a name for both the app and its extensions.
This Apple Programming Guide explains how app groups work and how to use them to share data.
anchorBroadcast Upload Extension for Screen Sharing
anchoriOS 11 introduced a built-in screen recording and broadcast feature, allowing you to record your screen without jailbreaking or using external software. The WWDC Video provides a high-level overview.
The Webex SDK transfers the screen recording data from your iOS device to other participants, which is why the broadcast upload extension is needed.
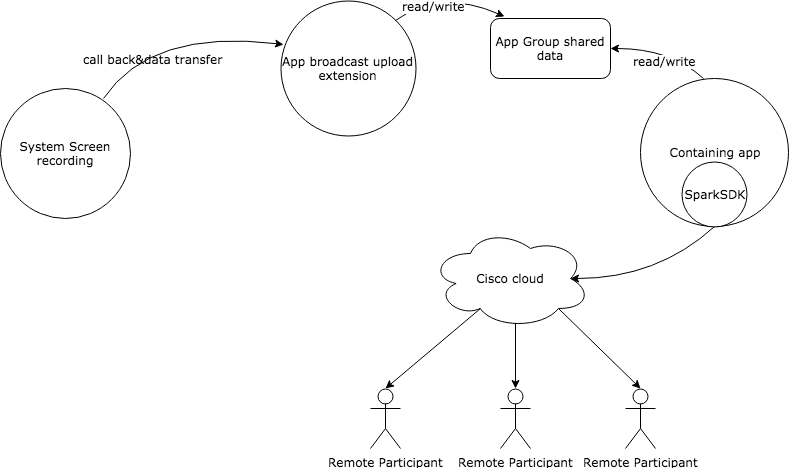
An app containing one or more extensions is known as a containing app. App extensions allow you to extend functionality beyond your app into other apps or the system. The App Extension Programming Guide covers everything you need to know about app extensions.
anchorImplement a Broadcast Upload Extension
anchorThis procedure was developed using Xcode 8 and iOS 11.2.
To implement a broadcast upload extension:
Set up your own App Group by following this guide to enable the App Group capability and name it. This will be used in steps 4 and 5.
In Xcode, go to File -> New -> Target -> iOS Application Extension and select Broadcast Upload Extension to create a new extension target. The Broadcast Setup UI Extension is optional.
Modify your project's
Podfileto addWebexBroadcastExtensionKitfor your broadcast extension target. Runpod installorpod updatefrom your project directory:target 'SDKExampleBroadcastExtension' do platform :ios, '13.0' pod 'WebexBroadcastExtensionKit' endIn Xcode, locate
SampleHandler.swiftin your broadcast extension folder. Use the SDK broadcast extension method to enable screen sharing. Add your app and extension to the same App Group and pass the App Group Identifier to the SDK:WebexBroadcastExtension.sharedInstance.start(applicationGroupIdentifier: "group.your.application.group.identifier") { error in // Handle any errors here }End the broadcast when the extension ends or at any desired point:
override func broadcastFinished() {
    // User has requested to finish the broadcast.
    WebexBroadcastExtension.sharedInstance.finish()
}
When the system delivers the video sample buffer to your extension, call the SDK's
handleVideoSampleBuffermethod:override func processSampleBuffer(_ sampleBuffer: CMSampleBuffer, with sampleBufferType: RPSampleBufferType) { switch sampleBufferType { case RPSampleBufferType.video: // Handle video sample buffer WebexBroadcastExtension.sharedInstance.handleVideoSampleBuffer(sampleBuffer: sampleBuffer) case RPSampleBufferType.audioApp: // Handle audio sample buffer for app audio break case RPSampleBufferType.audioMic: // Handle audio sample buffer for mic audio break } }Observe the broadcast server state changes and handle errors from the containing app:
WebexBroadcastExtension.sharedInstance.onError = { error in
    switch error {
    case .illegalOperation(let reason):
        // The request is illegal.
        break
    case .illegalStatus(let reason):
        // The request is in an illegal status.
        break
    case .serviceFailed(let code, let reason):
        // A request to the Webex SDK containing app failed.
        break
    }
}

WebexBroadcastExtension.sharedInstance.onStateChange = { state in
    switch state {
    case .Initiated:
        break
    case .Broadcasting:
        // Connected with the containing app broadcast server.
        break
    case .Suspended:
        // The containing app broadcast server connection is suspended.
        break
    case .Stopped:
        break
    }
}
Refer to this sample for WebexBroadcastExtension usage: WebexBroadcastExtension Demo.
Use
call.oniOSBroadcastingChangedto monitor the connection status of the user's broadcast extension:call.oniOSBroadcastingChanged = { event in switch event { case .extensionConnected: // Handle extension connected break case .extensionDisconnected: // Handle extension disconnected break } }Once the broadcast extension is connected, start and stop screen sharing with:
call.startSharing { error in
    // Handle any errors
}
call.stopSharing { error in // Handle any errors }The complete demo app is available on this GitHub repo.
To run your Broadcast extension:
- Add screen recording to Control Center: Open Settings -> Control Center -> Customize Controls. Tap the '+' next to Screen Recording.
- Start your broadcast extension: Swipe up to open Control Center. Long press the recording button. Select your extension, then tap Start Broadcast.
To debug your app extension:
- If debugging your app with Xcode, attach to the app extension process when it starts. Go to Xcode -> Debug -> Attach to Process -> [Your Broadcast Extension].
- Alternatively, use Debug -> Attach to Process -> By Process Identifier (PID) or Name..., enter your app extension's name, and Xcode will attach to it automatically when started.
Development Tips for App Extensions
- App extensions have different life cycles and restrictions compared to apps. Avoid heavy tasks in the extension to comply with memory and CPU usage limits.
- Use only available system methods in extensions to avoid compilation warnings or App Store rejections. Refer to Apple's Extension Programming Guide.
- Share code between your app and its extension using an embedded framework. Ensure the "Allow app extension API only" box is checked in your framework's project settings.

anchorSet the Screen Sharing View
anchorUse MediaOption to configure the viewing of shared screens from remote participants.
let option = MediaOption.audioVideoScreenShare(video: (localVideoView, remoteVideoView), screenShare: remoteScreenView)

webex.phone.dial("coworker@acm.com", option: option) { ret in
    switch ret {
    case .success(let call):
        call.onConnected = {
            // ...
        }
        call.onDisconnected = { reason in
            // ...
        }
    case .failure(let error):
        // Failure.
    }
}
Provide a view only when the other party starts sharing their screen:
let option = MediaOption.audioVideoScreenShare(video: (localVideoView, remoteVideoView))

webex.phone.dial("coworker@acm.com", option: option) { ret in
    switch ret {
    case .success(let call):
        call.onConnected = {
            // ...
        }
        call.onDisconnected = { reason in
            // ...
        }
        call.onMediaChanged = { changed in
            switch changed {
                ...
            case .remoteSendingScreenShare(let sending):
                call.screenShareRenderView = sending ? remoteScreenView : nil
            }
        }
    case .failure(let error):
        // failure
    }
}
anchorScreen Sharing Optimization
anchorThe ScreenShare Optimization methods can enhance screen sharing for video and text. These improvements are available from version 3.9.0 onwards.
Screen Sharing Optimization Examples
Screen sharing methods are accessible through the Call object. The Call object can be obtained as a result of the webex.phone.dial method or through the webex.phone.onIncoming method for an incoming call:
Start ScreenSharing with
shareConfig:call.startSharing(shareConfig: self.shareConfig, completionHandler: { error in if error != nil { print("share screen error:\(String(describing: error))") } })The
shareConfigparameter is optional. If not provided, the default optimization will apply, and audio will not be shared. This parameter was introduced in version 3.9.0.Retrieve the active sharing type for the current call with the
getShareConfigmethod.let sharingConfig = call.getShareConfig()
Set ShareConfig
To configure ShareConfig:
    // This doesn't set any special optimization. Maximum is 3 fps. This is the default setting if no parameters are passed to the shareConfig param.
    let shareConfig = ShareConfig(ShareOptimizeType.Default, false)

    // This helps in optimizing screenshare while sharing video and motion without audio. Maximum is 30 fps.
    let shareConfig = ShareConfig(ShareOptimizeType.OptimizeVideo, false)

    // This helps in optimizing screenshare while sharing text and images. Maximum is 3 fps. Resolution of text and images gets better.
    let shareConfig = ShareConfig(ShareOptimizeType.OptimizeText, false)
Configure OptimizeVideo in BroadcastExtension
When a user selects ShareOptimizeType.OptimizeVideo, communicate this choice to the BroadcastExtension using UserDefaults:
if let defaults = UserDefaults(suiteName: groupIdentifier)
{
    switch self.shareConfig?.shareType {
    case .OptimizeVideo:
        defaults.setValue(true, forKey: "optimizeForVideo")
    default:
        defaults.setValue(false, forKey: "optimizeForVideo")
    }
}
Based on this setting, call the appropriate method in WebexBroadcastExtension:
if UserDefaults(suiteName: groupIdentifier)?.bool(forKey: "optimizeForVideo") == true {
    WebexBroadcastExtension.sharedInstance.optimizeForVideo()
}