Integrating Your Webex Devices with Webex Connect
April 1, 2022

With Cisco Webex Devices, we can program and create highly customizable experiences using its built in JavaScript based Macro support. Using Macros, we can integrate with other services using the devices HTTP Client support and Webhooks. Webex Connect is an API and low-code Communications Platform as a Service (CPaaS) which our Macros can use to send messages to people on popular communication channels such as Email, SMS and WhatsApp. In this blog we will have a look at an example Macro which can send a guest meeting invitation via SMS using Webex Connect, from a Webex Device.
Intro to Webex Device Macros
Cisco Webex Devices support a powerful API called xAPI which can modify device configuration, execute commands and monitor events and status changes. You can use these xAPI commands via SSH, WebSockets and cloud-based Rest API methods. In our case we will use them within a Macro running on the device itself and in order to upload a Macro to webex device, we will need admin access.
Accessing the admin interface
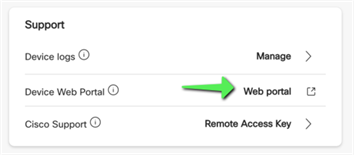
If your Webex Device is registered to Webex as opposed to on premise, the admin account is disabled by default, therefore will need to enable it by going through Control Hub. Log into admin.webex.com while on the same network as your device. Then find your device and then click on the Device Web Portal link which will open a web session for your device.
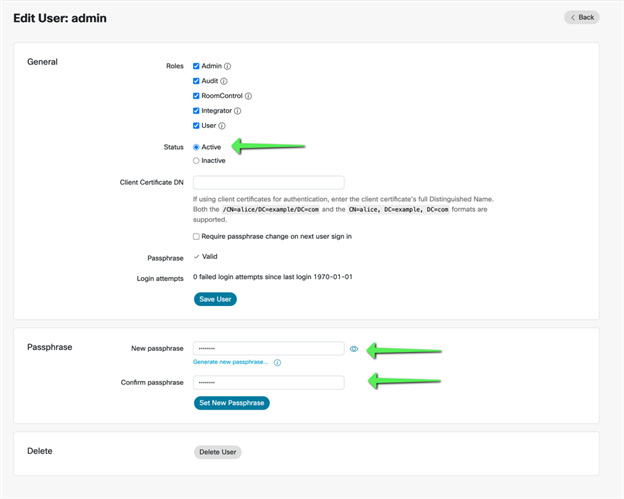
On the Webex Devices web interface, go to users and then enable the admin account by setting its status to active and click save user. Also on this page, set a passphrase and save. You can now log into your device with the admin account without going through Control Hub.
Sending a HTTP POST
Unlike running JavaScript in your browser or NodeJS, Macros cannot make HTTP connections directly and must instead use the Webex Devices built in HTTP Client. This isn’t enabled by default, and you can either enable it manually on the device settings or at the beginning of your Macro itself using the command below.
xapi.Config.HttpClient.Mode.set(‘On’);
More information on this command can be found here: https://roomos.cisco.com/xapi/Configuration.HttpClient.Mode/xapi.Config.HttpClient.Mode.set(‘On’);
For our Macro we want to be able to generate a guest meeting invitation link via an online resource and send that via SMS using Webex Connect and in both cases we need to use HTTP POSTs so this step is important.
When using the HTTP POST xAPI, we can send Headers and Body content as normal. However, if we want to receive a body response, we must also include the ResultBody parameter. Otherwise, all we will get is the response code. Below is an example HTTP POST xAPI command which shows Headers with a Bearer token example. The body of the POST contains a JSON sand logs the response to the console. More information about the HTTP POST xAPI command can be found here.
const headers = [
    'Content-Type: application/json',
    'Authorization: Bearer ' + TOKEN
];

const bodyContent = {
    "from": "+1234567890",
    "to": "+1234567890",
    "content": "",
    "contentType": "Test Message"
};
xapi.Command.HttpClient.Post(
    { Header: headers,
    ResultBody: 'PlainText',
    Url: POST_URL },
    JSON.stringify(bodyContent))
    .then((result) => {
    console.log(result);
  });
Now that we are able to send HTTP POSTs from a Webex Device, we already have the beginnings for sending our invitation to Webex Connect via a webhook.
More Webex Device HTTP information is available here:
Creating Buttons and UI elements
On Webex Devices, there is a built in UI Editor which you can use to create Buttons and Panels that your Macro code can listen for input events from and react accordingly. You could create a Macro and UI elements separately but this approach would mean you would need to deploy two files to the device. Instead, we can create both the initial main buttons and responsive UI panels all from a single macro. This makes our Macros easier to deploy to devices.
Using the UserInterface xAPI command in this example, we can create a button on the main UI with the panel ID ‘sms_invite’.
xapi.Command.UserInterface.Extensions.Panel.Save(
    {
        PanelId: 'sms_invite'
    }, ` <Extensions>
       <Version>1.8 </Version>
       <Panel>
         <Order>1 </Order>
         <Type>Statusbar </Type>
         <Icon>Input </Icon>
         <Color>#A866FF </Color>
         <Name>SMS Invite </Name>
         <ActivityType>Custom </ActivityType>
       </Panel>
     </Extensions>`);
Here is what the above command creates on the touch interface.
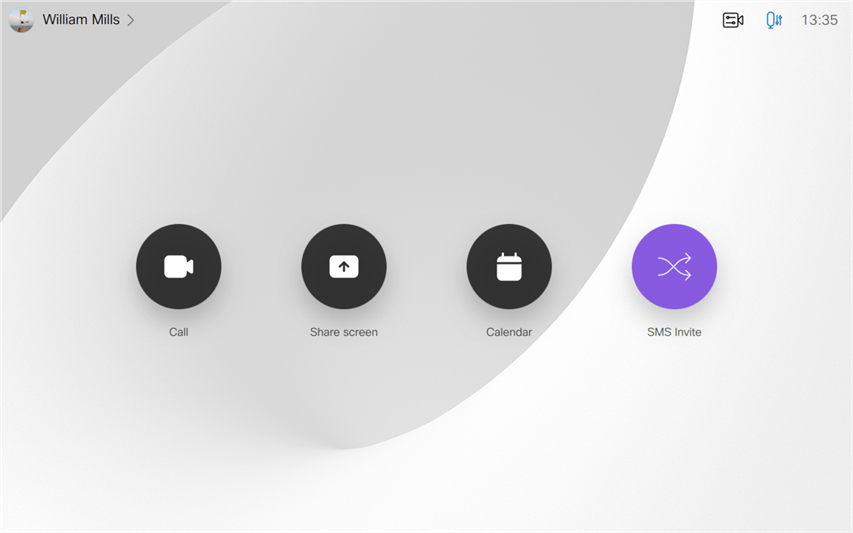
Using the ``UserInterface Extensions Panel Clicked``` xAPI listener, we can react to button being pressed and then display a message prompt panel.
xapi.Event.UserInterface.Extensions.Panel.Clicked.on( (event) => {
    if(event.PanelId == 'sms_invite'){
      console.log('SMS_Invite Selected')
      // Open main panel and ask for destination number
    }
});
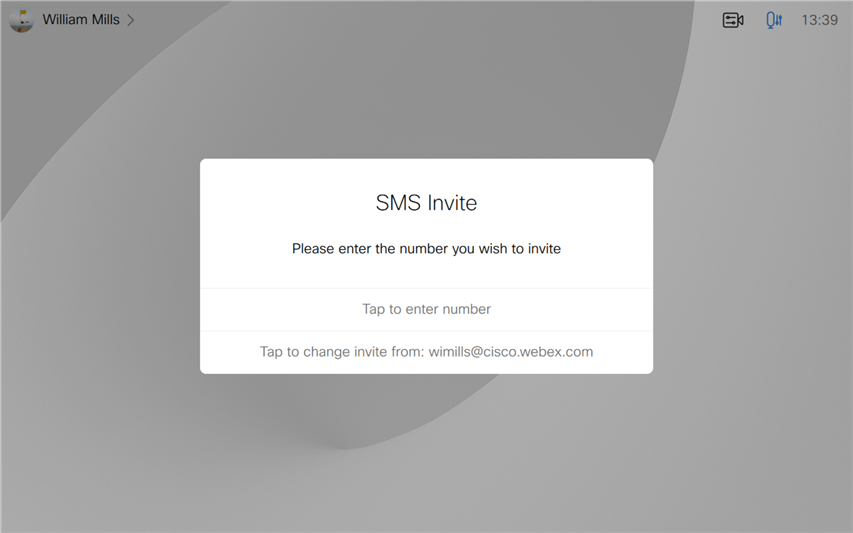
Next we can then listen for presses on the message panel using the Feedback ID and prompt text and number inputs accordingly.
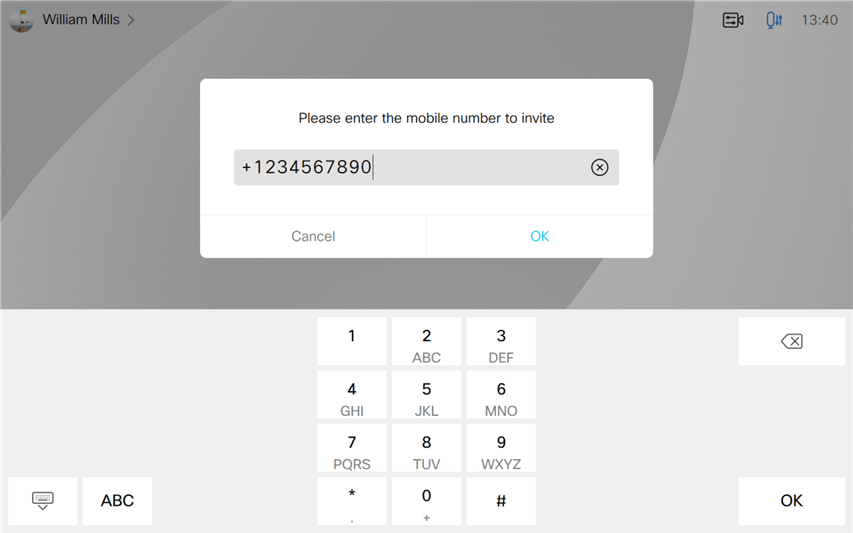
Once the new phone number has been entered and the user hits the send invite button, we can carry out our HTTP POSTs to generate and send the invitation.
One trick you can do to help create the XML for your UI elements is to first use the Webex Devices built in editor to design your button or panel and then export the XML from the editor and then use it in your Macro.
Introduction to Webex Connect Sandbox
Webex Connect is an enterprise-grade cloud communications platform which provides an easy-to-use visual flow builder tool that enables you to create two-way communication channels. To learn about developing with Webex Connect there is a developer sandbox available which can send messages to a single approved number via SMS, Voice and WhatsApp. In a production environment, you would of course be able to send to more than just a single number than the sandbox provides. You can create a sandbox account using the self-sign-up page here.
For our use case, we are only going to use the SMS messaging API. Logging into the sandbox will show an SMS example information for you to use. The sandbox requires four parameters in the JSON payload, from, to, content and contentType. Additionally, you will need to take note of the service key. You can test sending an SMS via the sandbox web interface or by copying the same information over to postman and trying it out there.
curl -X POST 'https://api-sandbox.imiconnect.io/v1/sms/messages'
\ -H 'Authorization: 123456-7890-abced-fghij-klmnopqurstuvwxyz'
\ -H 'Content-Type: application/json'
\ -d '{
    "from": "+1234567890",
    "to": "+1234567890",
    "content": "",
    "contentType": "Test Message"
    }'
The example curl command on the home screen of the dashboard shows all the important values clearly and as you can see is the same JSON payload as the HTTP POST example we created above in the xAPI HTTP POST example.
Integrating everything
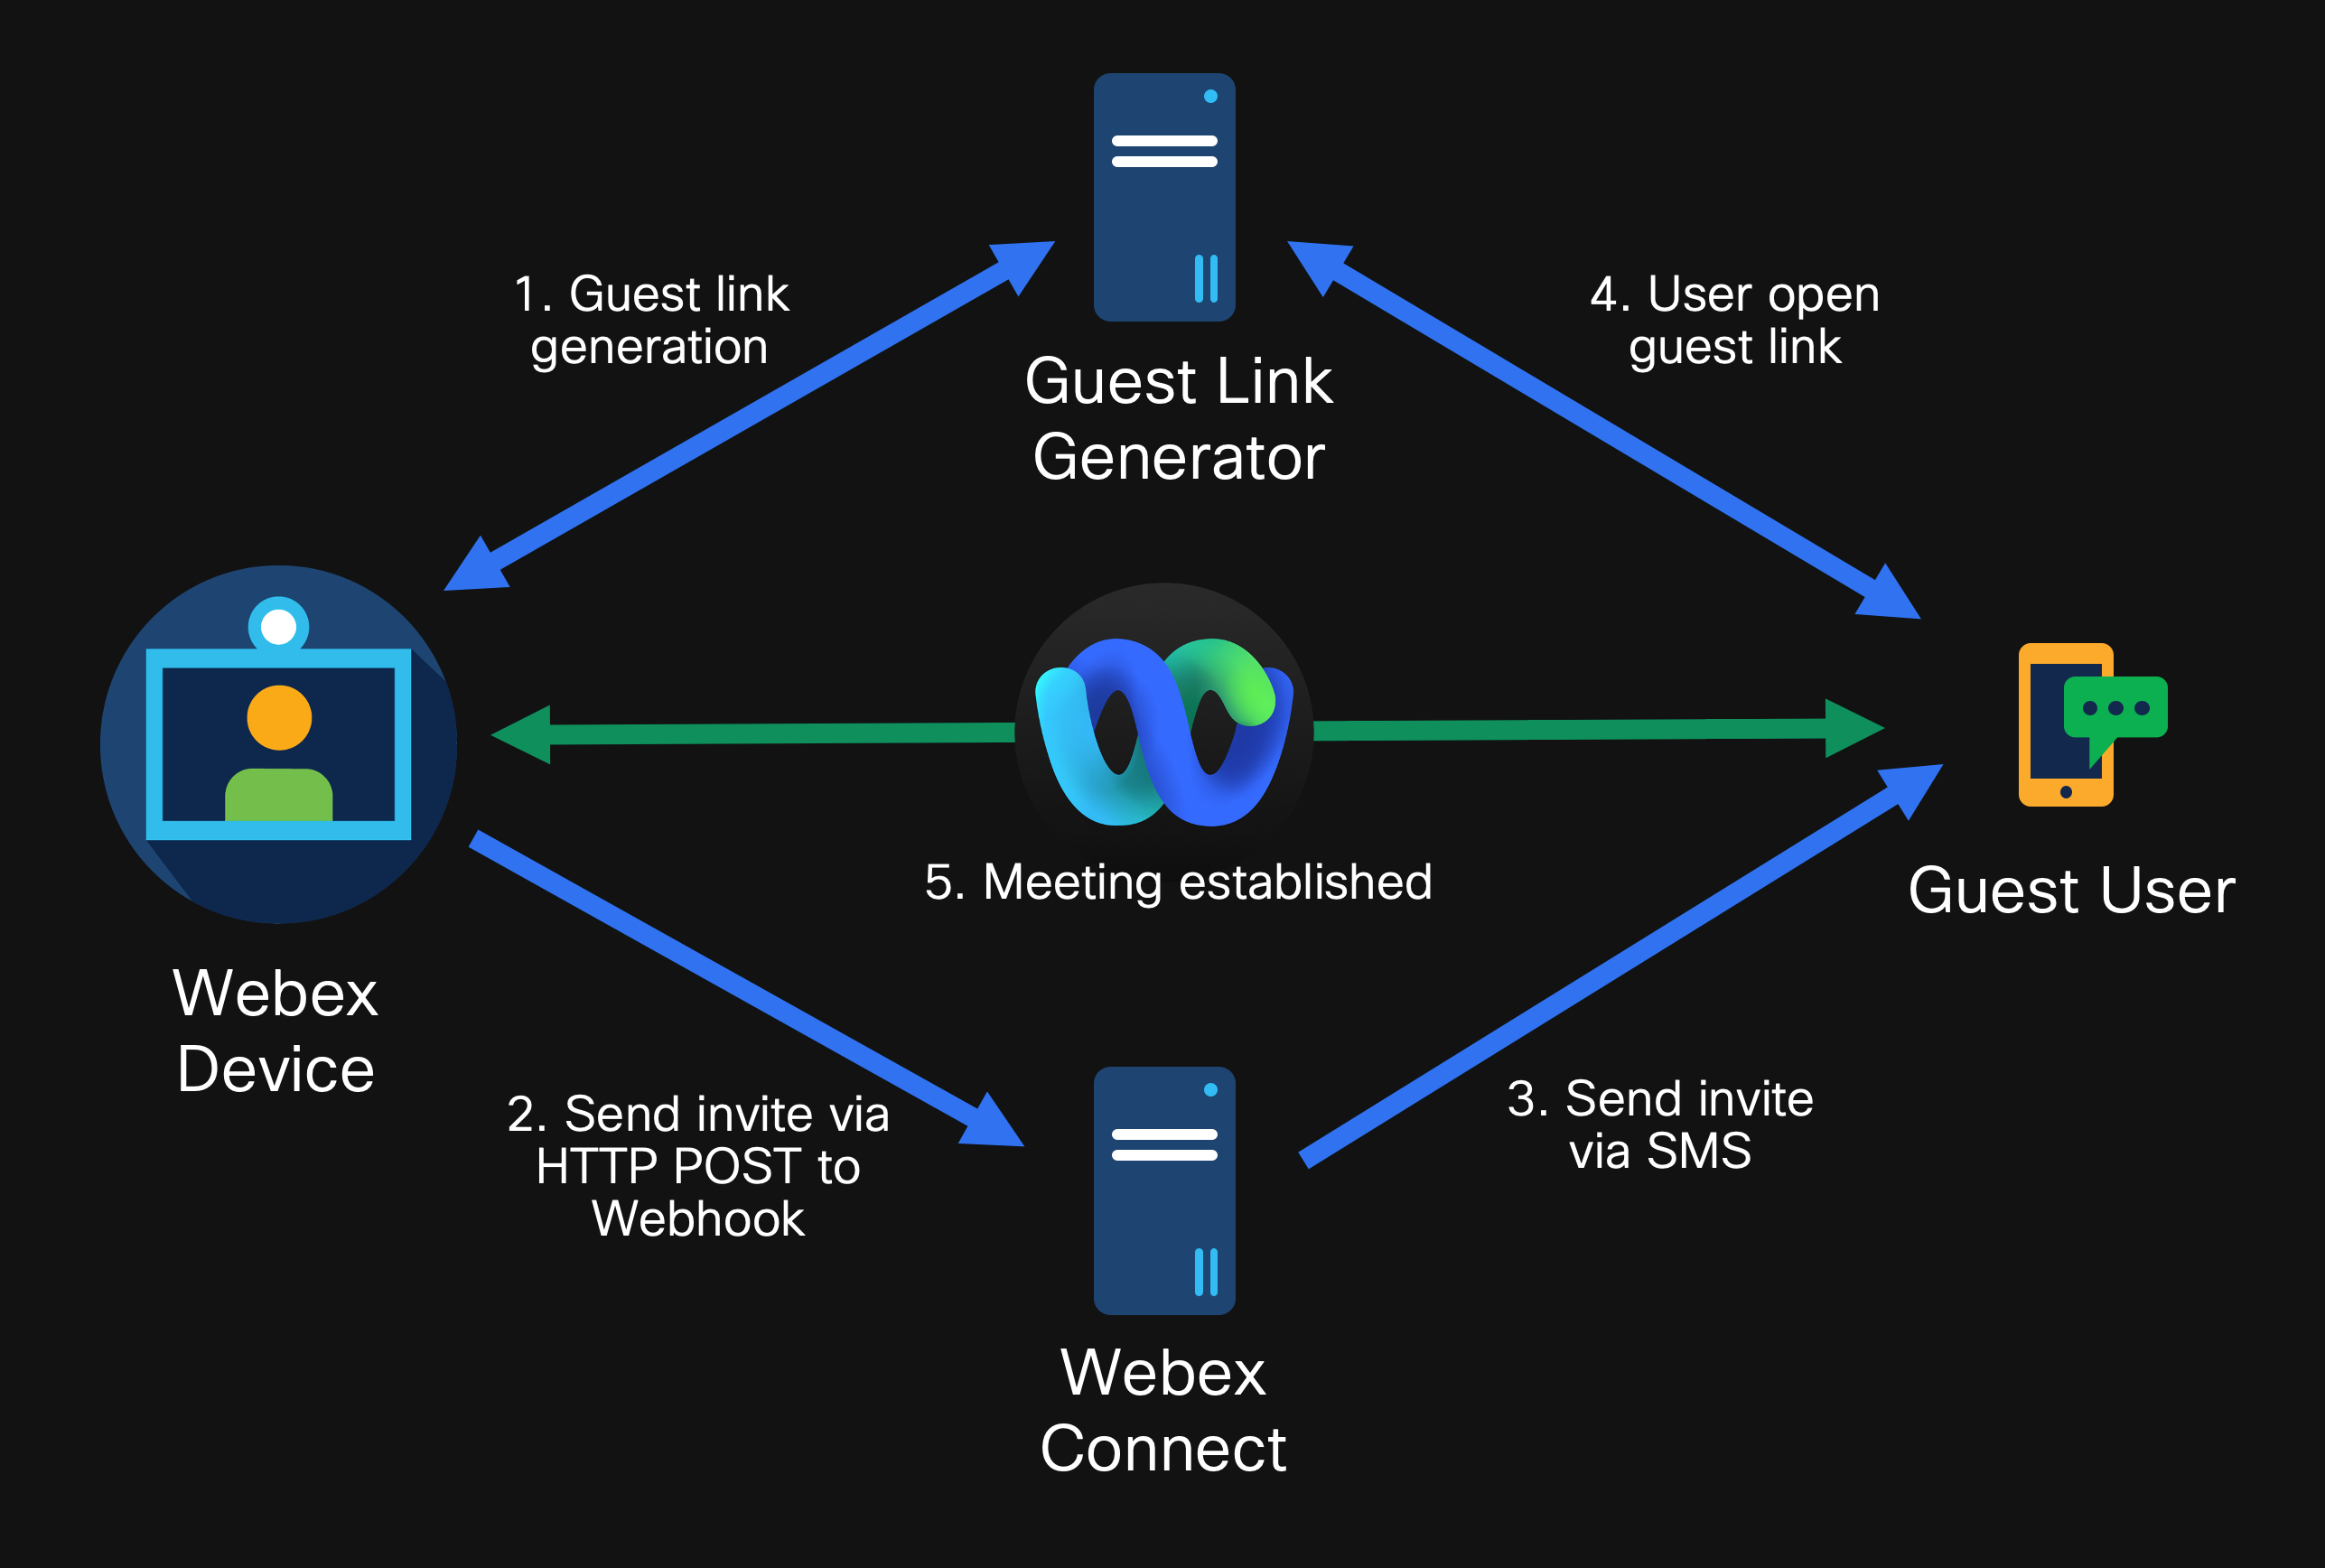
We have seen how to send HTTP POSTs and generate UI elements on a Webex Device, also we can send an SMS via imimobile. Now let's see an example of it all working together.
Here is an overview of the flow in which we can create a guest meeting invitation from another service and then send that invitation as an SMS to a mobile, allowing a guest to join a Webex Meeting without any app and all through the browser using the Webex Web SDK.
Try it Out Now
A copy of the complete Macro is available on GitHub:
https://github.com/WXSD-Sales/SMS-Macro/tree/sandbox_with_guest
Follow the GitHub read me to setup and configure the Macro for your environment.