Integrate Audio and Video Features into an iOS app using the Cisco Spark SDK
June 10, 2017.png?width=100&height=100&fit=crop)

Let’s say you want to develop an app on the iOS platform that allows you and your customers to easily communicate with each other. You want to show your products, but also want to provide live support to them when they need help. Wouldn’t it be amazing if you could add audio and video into the app, and make the connections with a few simple touches?
Now, this becomes possible and much simpler - Cisco has released an iOS Spark SDK which allows any iOS developer to easily integrate Spark audio and video calling features into an iOS app.
We will provide a sample app here to get you started, including a demo video, which explains how the SDK exactly works, so you can expand and modify it for any usecase or idea. There is no complex code to learn, and Cisco takes care of all underlying audio and media flows, so it’s very quick to learn and implement.
The following app is for a “VIP Help Centre” where a user can get not only chat support but also audio and video assistance. To start, please watch this video for a demonstration of the app functionality – once you’ve completed the video, move on to the rest of the blog for an explanation of the code.
You’ll need Xcode installed and open in order to access the built-in simulator used in the video – just go to “Xcode -> Open Developer Tool -> Simulator” in the menu. The demo app works well with both the simulators for iPhone 6 and 7 series.
Ok, time to get started on the code itself.
Preparation Work:
At the first step, we have to get the SDK installed, which is outlined here, so we won’t talk much about it. Once the SparkSDK is imported into the app without issue, we are ready for the next step.
Secondly, we need to create an OAuth app. It’s used for the iOS app to get an access token so that it can operate on behalf of a user (security and authentication). Here is the document for how Spark OAuth works, and this is the place to create an OAuth app. The redirectUri has to be “Sparkdemoapp://response”, the scope has to be “spark:all”. Then we get the clientId and clientSecret.
Lastly, we need a simple UI. Since this is just a demo, we won’t do much decoration work, and just show the main UI elements.
Sign in, Authorize and Sign out:
After the app loads, we need to see whether the user has already authorized his app or not. The below two lines are to get an initialized authenticator, then get a Spark object:
authenticator = OAuthAuthenticator.init(clientId: clientId, clientSecret: clientSecret, scope: scope, redirectUri: redirectUri)

spark = Spark.init(authenticator: authenticator!)
We can use the “authorized” attribute of “authenticator” to see if the user has authorized or not. If no, go to the beforeLoginAndAuth() function to show a button asking the user to log in and authorize, otherwise, let him pass the step and go to the main board. The whole script would be:
override func viewDidLoad() {
        super.viewDidLoad()
        self.spaceName.delegate = self // set up textField delegate

        authenticator = OAuthAuthenticator.init(clientId: clientId, clientSecret: clientSecret, scope: scope, redirectUri: redirectUri)
        spark = Spark.init(authenticator: authenticator!)
        if  !authenticator!.authorized {
            beforeLoginAndAuth()
        } else {
            spark!.authenticator.accessToken(){ token in
                print("token :\\(token!))")
            }
            afterLoginAndAuth()
        }
}
In the view where users log in and authorize, we will add a button so they can click to start the process. We will show how to add a button and associate a function to the “touch-up” event on it next.
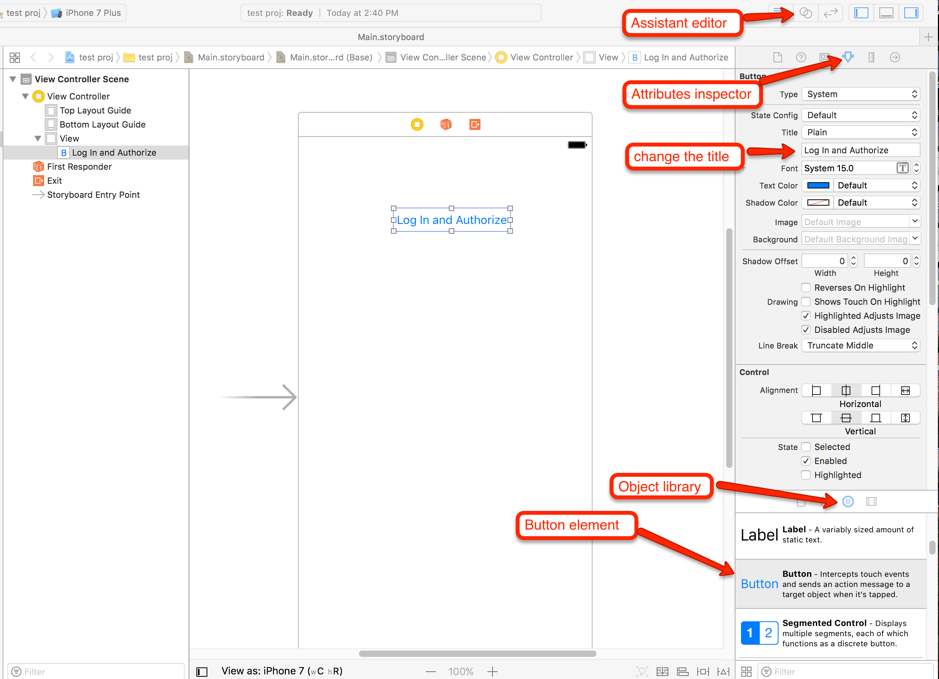
From the “Object library”, drag a button into the main board and give it a name like “Log in and Authorize” (in the “Attributes inspector”):

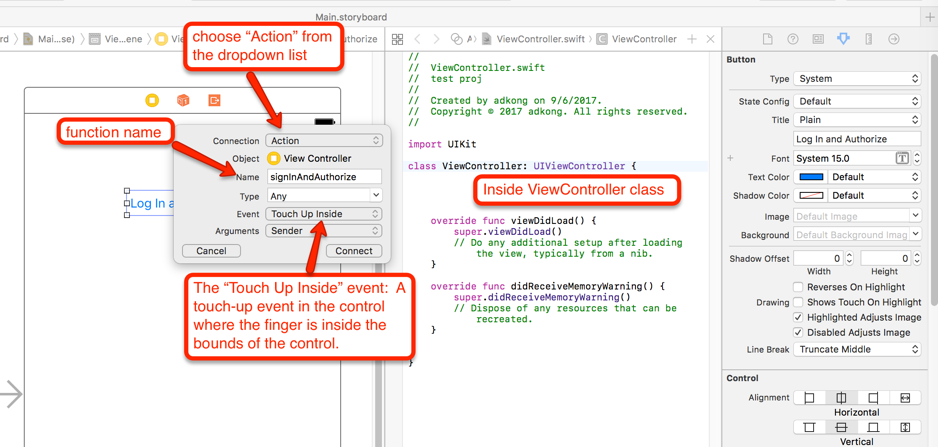
Then click the “Assistant editor”. Now we need to associate the touch-up action on the button with a function – press the “control” key on the keyboard (do not release), use the mouse to drag the button into the “ViewController” class in the script area, release the mouse, then a pop-up window will appear (we now can release the “control” key):

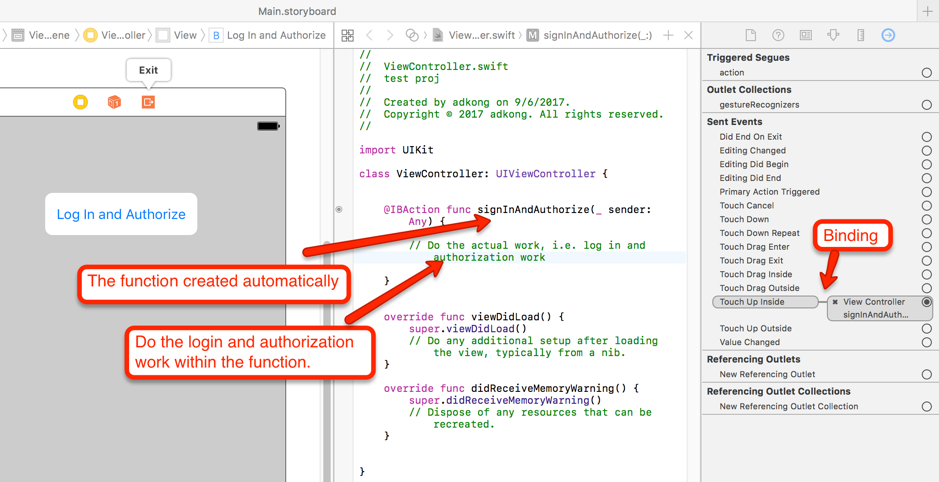
Choose the “connection” as “action”, give it a name, and set the “Event” as “Touch Up Inside”. Then after we click the “Connect”, it will automatically create a function in the “ViewController” class, and associate the function with the touch-up event on the button:

And under it we do the login and authorization work:
// sign in and do the authorization via Oauth
authenticator!.authorize(parentViewController: self) { success in
            if success {
                self.spark!.authenticator.accessToken(){ token in
                    print("token :\\(token!))")
                    self.afterLoginAndAuth()
                }
            }
        }
In this demo app, it is:

The authorize() method starts the signing in and OAuth process. It redirects the user to Spark interface to let him input username and password and accept the requested permissions defined in the OAuth scope. If it succeeds, the access token will be stored in environmental variables so that other actions can use it. Here we print out the token string for logging, then redirect to the afterLoginAndAuth(). In the view, we also have a “sign out” button which allows a user to de-authorize to sign out:
//sign out
spark?.authenticator.deauthorize()
Chat Support Channel:
Now, we’re in the main board. The “Chat Support” channel allows a user to create a Spark space with a custom space name. On the “Create a space” button, we register a “Touch Up Inside” event to it (same procedure as the above):

And under it we create a space:
// Create a new space
        spark!.rooms.create(title: spaceTitle){ response in
            switch response.result {
            case .success(let space):
                print("\\(space.title!), created \\(space.created!): \\(space.id!)")
                self.addMember(space:space)
            case .failure(let error):
                print("Error: \\(error.localizedDescription)")
                self.spaceSuccessLabel.text = "Failed to create a space, pls retry later!"
                return
            }
        }
And add a support rep into the space by email:
// Add a support rep to the space
    func addMember(space:Room) {
        if let email = EmailAddress.fromString(supportRepEmail){
            spark!.memberships.create(roomId: space.id!, personEmail: email) { response in
                switch response.result {
                case .success(let membership):
                    print("A member \\(self.supportRepEmail) has been added into the space. membershipID:\\(membership)")
                    self.sendMessage(space:space)
                case .failure(let error):
                    print("Adding a member to the space has been failed: \\(error.localizedDescription)")
                    self.spaceSuccessLabel.text = "Failed to add a rep, pls retry later!"
                    return
                }
            }
        }
    }
Post a message to the space:
// Post a text message to the space
    func sendMessage(space:Room) {
        spark!.messages.post(roomId: space.id!, text: "Hello, anyone can help me?") { response in
            switch response.result {
            case .success(let message):
                print("Message: \\"\\(message)\\" has been sent to the space!")
                self.spaceSuccessLabel.text = "The Spark space and rep are ready!"
            case .failure(let error):
                print("Got error when posting a message: \\(error.localizedDescription)")
                self.spaceSuccessLabel.text = "Failed to post a message, pls retry later!"
                return
            }
        }
    }
The complete sample script is:
//create a space when a user clicks the "create a space" button
    @IBAction func createSpace(_ sender: Any) {

        spaceName.isHidden = true
        createSpaceButton.isHidden = true
        spaceSuccessLabel.isHidden = false
        spaceSuccessLabel.text = "Creating a space, please wait!"

        var spaceTitle:String
        if spaceName.text == nil {
            spaceTitle = "Help Space"
        } else {
            spaceTitle = spaceName.text!
            if spaceTitle.trimmingCharacters(in: .whitespaces) == "" {
                spaceTitle = "Help Space"
            }
        }
        print("space title is: \\(spaceTitle)")

        // Create a new space
        spark!.rooms.create(title: spaceTitle){ response in
            switch response.result {
            case .success(let space):
                print("\\(space.title!), created \\(space.created!): \\(space.id!)")
                self.addMember(space:space)
            case .failure(let error):
                print("Error: \\(error.localizedDescription)")
                self.spaceSuccessLabel.text = "Failed to create a space, pls retry later!"
                return
            }
        }
    }

    // Add a support rep to the space
    func addMember(space:Room) {
        if let email = EmailAddress.fromString(supportRepEmail){
            spark!.memberships.create(roomId: space.id!, personEmail: email) { response in
                switch response.result {
                case .success(let membership):
                    print("A member \\(self.supportRepEmail) has been added into the space. membershipID:\\(membership)")
                    self.sendMessage(space:space)
                case .failure(let error):
                    print("Adding a member to the space has been failed: \\(error.localizedDescription)")
                    self.spaceSuccessLabel.text = "Failed to add a rep, pls retry later!"
                    return
                }
            }
        }
    }

    // Post a text message to the space
    func sendMessage(space:Room) {
        spark!.messages.post(roomId: space.id!, text: "Hello, anyone can help me?") { response in
            switch response.result {
            case .success(let message):
                print("Message: \\"\\(message)\\" has been sent to the space!")
                self.spaceSuccessLabel.text = "The Spark space and rep are ready!"
            case .failure(let error):
                print("Got error when posting a message: \\(error.localizedDescription)")
                self.spaceSuccessLabel.text = "Failed to post a message, pls retry later!"
                return
            }
        }
}
All the actions use the access token we get in the authorization step at the backend. If you want to know how exactly a space is created, how a message is posted, etc., please refer to this document for detailed information. They’re all REST requests, and the doc shows how to set the method, header and body.
Audio and Video Channel:
In the “Audio & Video Support” channel, we can send audio and video calls. If you want to dial SIP or PSTN destinations, you will need the correct privileges – contact your Spark org admin or your Cisco partner to confirm.
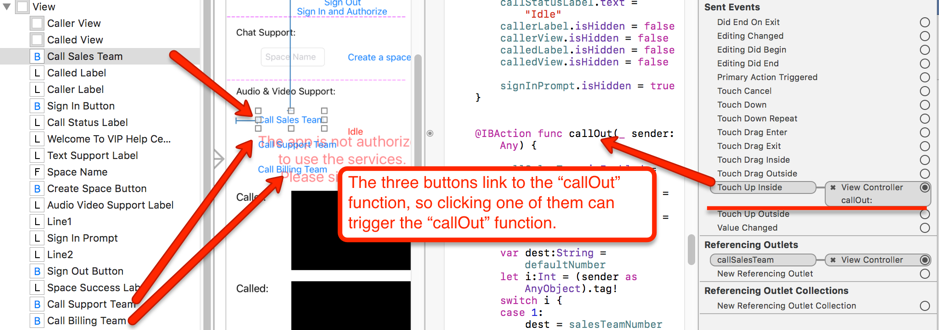
In the “call” buttons, we register a “Touch Up Inside” event (the same procedure as the “Log In and Authorize” step):

And under that we start doing the actual call.
The first step is to register a device:
spark?.phone.register()
If it succeeds, do the actual call:
// Make a call
var outboundCall:Call? = nil
                self.spark?.phone.dial(dest, option:MediaOption.audioVideo(local: self.callerView, remote: self.calledView)) { response in
                    switch response {
                    case .success(let call):
                        outboundCall = call
                        self.initCallCallBack(outboundCall!)
                        print("Call succeeded!")
                    case .failure(let error):
                        print("Call failed: \\(error.localizedDescription)")
                    }
                }
Note the “MediaOption.audioVideo”, it allows “audio” or “video” or both, and we can choose it based on requirement. It requires two parameters which specify the local and remote media views. In my demo, they’re the “callerView” and “calledView” views, defined as below:
@IBOutlet weak var callerView: MediaRenderView!
@IBOutlet weak var calledView: MediaRenderView!
Monitor call status:
In the call method, you may notice the initCallCallBack() method, and it defines the callback functions, as below:
call.onRinging
call.onConnected
call.onDisconnected
call.onMediaChanged
call.onCapabilitiesChanged
We can implement them and reflect the status to the UI. For example, in this demo we implement the .onRinging method:
call.onRinging = {
            self.callStatusLabel.text = "Call is ringing"
            print("callDidBeginRinging")
        }
and reflect the status to the callStatusLabel label then users can see “_Call is ringing_” when it rings on the called side.
So the whole script is like:
func initCallCallBack(_ call:Call){

        call.onRinging = {
            self.callStatusLabel.text = "Call is ringing"
            print("callDidBeginRinging")
        }

        call.onConnected = {
            self.callStatusLabel.text = "Called is connected"
            print("callDidConnect")
        }

        call.onDisconnected = { event in

            switch event {
            case .localCancel:
                self.callStatusLabel.text = "Local Cancel"
                print("Local Cancel!")
            case .localDecline:
                self.callStatusLabel.text = "Local Decline"
                print("Local Decline")
                .
                .
                .
            default:
                print("Disconnected - No Reason")
            }
        }

        call.onMediaChanged = { event in
            switch event {
            case .cameraSwitched:
                self.callStatusLabel.text = "Camera Switched"
                print("Camera Switched")
            case .localVideoViewSize:
                self.callStatusLabel.text = "Local Video View Size"
                print("Local Video View Size")
            .
            .
            .


            default:
                print("Media Changed - No Reason")
            }
        }
        }
Now, we have finished the coding work, and the complete code can be found on Github. If you have any questions, please contact devsupport@ciscospark.com 24/7/365 - we’re happy to help all the time!