Build a Click-to-Call Shortcut Using Adaptive Cards in Webex
May 1, 2023

If you've ever wanted to provide additional click-to-call options within your Webex conversations, this blog is for you. In this article, we will cover multiple examples which are used to build a reception kiosk check-in solution using Webex Devices and Webex Messaging as the notification channel.
Recap on Bots and Adaptive Cards
The Webex platform lets you create messaging bots, which can send and receive messages to Webex users or spaces where they have been mentioned. In addition to being able to send text, markdown or file attachments, Webex also supports the ability to send Microsoft Adaptive Card attachments.
Adaptive cards are JSON formatted attachments, which render as interactive content within the Webex App. Bots and Integrations can send these adaptive cards using the create message API and get events from the Webex platform whenever a user clicks on an adaptive card's Action.Submit button. This makes adaptive cards a powerful way for Webex users to interact with your bot.
The Use Case
Imagine you have an unstaffed reception, and you want to setup a kiosk check-in system where guests can enter their contact details, which would then notify your remote staff. Additionally, we may want to provide virtual assistance where the staff can remotely greet guests after checking in.
In this case, we can use a Webex Device such as a Desk Pro or Mini to display a check-in Web App while the device is in Kiosk Mode, or we can leverage the devices native UI extensions and macros. When a guest walks up to the kiosk device, they are presented with an option to enter their details using either method, and the details will be sent to a member of staff.
In our case, we can send this check-in event as an adaptive card notification into a Webex space. This will include the check-in details as well as the kiosk device's location and the SIP address, so the staff can call and greet the guest after check in.
The example reception macro mentioned above does all these steps. It also includes a UI extension based on the collected guest details and provides a notification to a Webex space, as well as conditional auto answer features, ensuring approved staff member's calls will always be answered by the kiosk device.
Click-to-Call Protocol Handler
Protocol handlers are like hyperlinks, which we see all the time while browsing the web. Operating systems can open specific applications depending on which protocol is used in the hyperlink URI. For example:
mailto:user@example.com-> Opens with the system default email client.https://www.example.com-> Opens with the system default web browser.
This is also the case for calling links, which have many protocols available, here are some standard examples:
tel:+1234567890sip:user@example.com
Cisco has leveraged click-to-call protocol handlers with each of its generations of Desktop and Mobile clients. However, to avoid conflicts with other applications, Webex uses its own protocol handlers. These are a few Webex App examples:
webexteams://im?email=user@example.com-> Opens a Webex chat with user@example.com.webexteams://meet?sip=user@example.com-> Places a call to user@example.com using the Webex App.
One limitation of the webexteams://meet?sip=user@example.com example is that it may fail to call regular SIP destinations by wrongfully assuming we are trying to dial a Webex user or dial into a meeting. The solution to this is to use other protocol handlers, giving us a consistent click-to-call experience without interference for other applications or when creating a meeting. Because we simply want to make a URI based call with our Webex App, we can use the webextel: protocol handler, instead:
[webextel:+1234567890](webextel:+1234567890)[webextel:device@example.com](webextel:device@example.com)
Here is an example Adaptive Card JSON with a markdown protocol handler link:
{
  "type": "AdaptiveCard",
  "$schema": "http://adaptivecards.io/schemas/adaptive-card.json",
  "version": "1.3",
  "body": [
    {
        "type": "TextBlock",
        "text": "Kiosk Check In Event",
        "wrap": true,
        "horizontalAlignment": "Center"
    },
    {
        "type": "FactSet",
        "facts": [
            {
                "title": "Guest Name:",
                "value": "John Smith"
            },
            {
                "title": "Location:",
                "value": "Building A - Main Lobby"
            },
            {
                "title": "Local Time:",
                "value": "10:00AM - EST"
            },
            {
                "title": "Device Number:",
                "value": "[Click to call - device@example.com](webextel:device@example.com)"
            }
        ]
    }
  ]
}
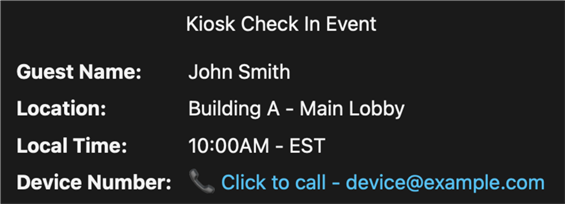
This is how the above adaptive card looks when rendered in the Webex App:
Action Submit Button
Adaptive cards allow us to add Action.Submit buttons which when pressed, send an attachment action event to the backend service associated with whoever made the card, in our case the bot. From the Webex Platform, this can be sent as either a Webhook event or, when using the NodeJS SDK, can be received using a WebSocket connection.
Here is an example of the Action.Submit button and how it would appear on an adaptive card.
"actions": [
  {
     "type": "Action.Submit",
     "title": "Request Call Back",
     "data": {
       "command": "callback",
       "deviceId": "1234567890"
     }
  }
]
Here is the same adaptive card as above but with the Action.Submit button:
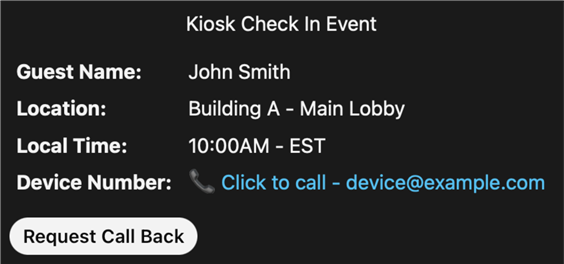
Notice how we can include a command string and Webex Device ID as a payload for the Action.Submit button. This can be used by our bot's backend to send a Cloud xAPI Dial command to the Webex Device and call the target number (the person who clicked the button). In this way, we can control who has access to request a call back from the device based on the space membership.
When we receive an attachmentActions event notification from Webex, we look up the event's inputs and parse the data which was sent. In this case, we know the Webex Device ID, who created the Action.Submit event, and we have a request for a callback from that device.
Our bot can now use the Cloud xAPI Dial command to instruct the Webex Device to dial the SIP URI of the staff member. Here is an example of the Cloud xAPI Dial request:
POST https://webexapis.com/v1/xapi/command/Dial
{
  "deviceId": "<deviceId from Action Submit payload>",
  "arguments": {
    "Number": "<user@example.com>"
  }
};
By using the Webex protocol handler links within adaptive cards, we're able to make a simple click-to-call demo. This demo can be further adapted to satisfy diverse use-cases such as gathering data from the user via Webex Devices, notifying approved staff members of check-in events with associated details, auto answer features and more. All this while ensuring a constant and reliable user experience across many verticals including Hospitality, Retail, Healthcare, and others. Check out our Github Organization and our Webex Labs site to see other resources we have for a plethora of use cases.
More information
You can find a copy of the reception check-in macro here: https://github.com/wxsd-sales/reception-macro.
More information on the Webex Protocol handlers is available here: https://help.webex.com/en-us/article/0xvuwab/Overview-of-Webex-Calling.
Getting Help
As always, we have a lot of great developer resources to assist along the way, whether it is needing help leveraging Adaptive Cards or questions about our Webex APIs and SDKs.
If you are Cisco Internal or a Cisco Partner with a Cisco login:
- Check out Webex Labs for Demos and Proof of Concepts like this that show what's possible with Webex APIs, Macros and SDKs
- Check out our Art of the Possible page, to see more opportunities to develop with Webex APIs
Don't forget that everyone can access our amazing Webex Developer Support team to help with questions and troubleshooting - https://developer.webex.com/support.