AI in Webex
Bring Your Own AWS Lex Virtual Agent
Transform your contact center with intelligent voice interactions using Webex Contact Center's BYOVA (Bring Your Own Virtual Agent) feature and AWS Lex.
anchorIntroduction
anchorWebex Contact Center's BYOVA (Bring Your Own Virtual Agent) feature allows you to integrate your own AI-powered voice agents directly into your contact center workflows. Combined with AWS Lex, you can create sophisticated conversational AI experiences that handle customer inquiries, route calls, and provide intelligent responses.
This guide will walk you through the complete process of:
- Setting up a Webex Contact Center sandbox environment
- Configuring BYOVA and BYODS (Bring Your Own Data Source)
- Creating and configuring a AWS Lex bot
- Deploying and configuring the BYOVA Gateway
- Testing your voice AI integration end-to-end
What You'll Build: A fully functional voice AI system where customers can call your contact center, interact with an AWS Lex-powered virtual agent, and seamlessly transfer to human agents when needed.
anchorPrerequisites
anchorBefore starting, ensure you have:
Webex Account: A Webex account (create one at webex.com if needed)
Webex Contact Center Access: Either:
- Follow Step 1 to request a sandbox (recommended for first-time users)
- OR have existing access to a Webex Contact Center organization with BYOVA feature enabled
AWS Account: An active AWS account with appropriate permissions
Development Environment:
- Python 3.8 or higher
- Git
- Terminal/Command Prompt access
Gateway Hosting: You'll need a public HTTPS URL for your gateway:
- For Testing: Use ngrok (free tier available) - covered in Step 3
- For Production: Prepare a public domain with HTTPS (AWS, Azure, GCP, or on-premises)
- Note: You'll configure this URL in Step 3 and use it throughout Steps 4-5
Basic Knowledge: Familiarity with:
- Webex Contact Center concepts
- AWS services (Lex, IAM)
- Python development
- gRPC and REST APIs
anchorStep 1: Setting Up Your Webex Contact Center Sandbox (Optional)
anchorSkip this step if: You already have access to a Webex Contact Center organization. If you do, jump to section 1.4 to ensure BYOVA is enabled.
1.1 When You Need a Sandbox
Request a sandbox if:
- This is your first time using Webex Contact Center
- You need a fresh environment for testing BYOVA
- You don't have access to any WxCC organization
1.2 When to Skip This Step
Skip if:
- You already have admin access to a WxCC organization
- You have a production WxCC environment for testing
- You've previously set up a sandbox that's still active
If you're skipping, continue to section 1.4 to verify BYOVA is enabled.
1.3 Request a Sandbox
Sign in to Webex Developer Portal
- Go to developer.webex.com
- Sign in with your Webex account
Navigate to Contact Center Sandbox
- Go to Contact Center Sandbox
- Click "Request a Sandbox"
Complete the Request Process
- Read and accept the Terms and Conditions
- Check "By creating this app, I accept the Terms of Service"
- Click "Request a Sandbox"
Wait for Provisioning
- Sandbox creation takes up to 15 minutes
- You'll receive several emails with account details
- Save the final provisioning email - it contains critical information
Your provisioning email will contain:
Administrator Account:
- Username:
admin@xxxxxx-xxxx.wbx.ai - Password:
******** - Webex Site URL:
xxxxxx-xxxx.webex.com
Agent Accounts:
- Premium Agent:
user1@xxxxxx-xxxx.wbx.ai(Extension: 1001) - Supervisor Agent:
user2@xxxxxx-xxxx.wbx.ai(Extension: 1002)
Phone Numbers:
- Main PSTN Number:
+1nnnnnnnnnn(for Webex calling) - Entrypoint Number:
+1nnnnnnnnnn(for Contact Center)
Open a Private/Incognito Browser Window
- Chrome:
Ctrl+Shift+N(Windows) orCmd+Shift+N(Mac) - Firefox:
Ctrl+Shift+P(Windows) orCmd+Shift+P(Mac)
- Chrome:
Navigate to the Administrator Portal
- Go to https://admin.webex.com
- Enter your administrator email and password from the provisioning email
Verify Access
- You should see the Webex Contact Center Administrator Portal
- Note the site configuration and available features
1.4 Request the BYOVA Feature (Required for All Users)
Important: Whether you're using a sandbox or existing organization, you need BYOVA enabled.
Copy your Organization ID
- In the Administrator Portal, navigate to Settings → Organization
- Copy the Organization ID
Submit a Developer Support Ticket
- Go to the Webex Developer Support page.
- Click "Contact Support" and fill out the ticket.
- Subject: Request to Enable BYOVA Feature for Webex Contact Center Sandbox
- Description:
- Hello Webex Developer Support Team,
- I would like to request the activation of the BYOVA (Bring Your Own Virtual Agent) feature for my Webex Contact Center sandbox environment.
- Organization Name: ACME Test Org
- Organization ID:
your-organization-id-here - Sandbox Email Used for Request:
admin@xxxxxx-xxxx.wbx.ai - Sandbox URL:
https://xxxxxx-xxxx.webex.com - This feature is required to continue development and testing for virtual agent integrations. Please let me know if you need any additional information.
- Wait for confirmation from the support team. You'll receive an email when BYOVA is enabled for your org.
anchorStep 2: Setting Up AWS Lex
anchor2.1 Sign in to your AWS account
- Sign in to the AWS Management Console and open the Amazon Lex console at https://console.aws.amazon.com.
2.2 Create Your AWS Lex Bot
You can create a bot with Amazon Lex V2 in multiple ways. If you want to learn more about all the ways, refer to this guide.
In this section, you create an Amazon Lex bot (BookTrip).
Sign in to the AWS Management Console and open the Amazon Lex console at https://console.aws.amazon.com/lex/.
On the Bots page, choose Create.
On the Create your Lex bot page,
- Choose BookTrip blueprint.
- Leave the default bot name (BookTrip).
Choose Create. The console sends a series of requests to Amazon Lex to create the bot. Note the following:
The console shows the BookTrip bot. On the Editor tab, review the details of the preconfigured intents (BookCar and BookHotel).
Test the bot in the test window.
If you would like to use generative AI to optimize LexV2 bot creation and performance, please refer to this guide
If you wish to use AWS Bedrock Agents with a custom knowledge base—as part of your autonomous bot workflow, here are some guides that can help you setup agents and knowledge base
2.3 Lex Bot Configuration & Testing
Once you have successfully created the Lex bot following the documentations provided above, please make sure to add Agent Intent to your bot.
Sign in to the AWS Management Console and open the Amazon Lex console at https://console.aws.amazon.com/lex/.
From the list of bots, choose the bot that you created, then from Add languages choose View languages.
Choose the language to add the intent to, then choose Intents.
Choose Add intent, give your intent a name, and then choose Add.
Add Sample Utterances
Agent
Can I talk to an agent
Can I talk to a person
Representative please
Connect me to a person
Feel free to add or remove utterances, but please keep it specific to the agent
Set up Fulfillment response
On successful fulfillment
Okay, transferring you to a human agent.In case of failure
I'm sorry, but I couldn't connect you to a human agent. Please try again.
After creation, test your bot inside the AWS Lex UI and ensure that all basic and agent-related intents work as expected.
2.4 Collect Lex Bot Identifiers
Once your bot is ready, note the following identifiers:
- Bot name
- Bot ID
- Bot alias name
- Alias bot ID
You will enter these into your Webex Lex connector configuration.
2.5 IAM Policy and Permissions
To allow Lex and its integrations to function, attach these managed policies to your IAM user:
- AmazonLexFullAccess
- AmazonPollyReadOnlyAccess (required for text-to-speech features)
For Bedrock/advanced integrations, you may to add extra policies. Please refer to this documentation to learn more.
2.6 Create access keys
Use your AWS account ID or account alias, your IAM user name, and your password to sign in to the IAM console.
In the navigation bar on the upper right, choose your user name, and then choose Security credentials.
In the Access keys section, choose Create access key. If you already have two access keys, this button is deactivated and you must delete an access key before you can create a new one.
On the Access key best practices & alternatives page, choose your use case to learn about additional options which can help you avoid creating a long-term access key. If you determine that your use case still requires an access key, choose Other and then choose Next.
(Optional) Set a description tag value for the access key. This adds a tag key-value pair to your IAM user. This can help you identify and update access keys later. The tag key is set to the access key id. The tag value is set to the access key description that you specify. When you are finished, choose Create access key.
On the Retrieve access keys page, choose either Show to reveal the value of your user's secret access key, or Download .csv file. This is your only opportunity to save your secret access key. After you've saved your secret access key in a secure location, choose Done.
Please save this Access Key and Secret Access Key very safely.
anchorStep 3: Obtaining Your Public URL
anchorYour gateway needs a publicly accessible HTTPS URL. This URL will be used consistently in:
- Service App domain configuration (Step 5.2)
- BYODS datasource registration (Step 5.3)
- Gateway JWT configuration (Step 4.2)
Important: Use the same URL format everywhere - no port numbers needed!
URL Format: Simple and Consistent
You'll use your URL in this format throughout the setup:
| Configuration Point | Example URL |
|---|---|
| Service App domain | abc123.ngrok-free.app |
| BYoDS registration | https://abc123.ngrok-free.app |
| Gateway JWT config | https://abc123.ngrok-free.app |
Choose Your Hosting Option
Option 1: Development/Testing with ngrok (Recommended)
Perfect for learning and testing BYOVA integrations.
Install and Configure ngrok
Install ngrok
# macOS with Homebrew
brew install ngrok/ngrok/ngrok

# Or download from https://ngrok.com/download
Create free account at ngrok.com
- Sign up (free tier includes what you need)
- Copy your authtoken from the dashboard
Configure authentication
ngrok config add-authtoken YOUR_AUTHTOKEN_HERE
Start ngrok Tunnel
# Start tunnel to your local gateway (port 50051)
# Use HTTP/2 protocol (required for gRPC)
ngrok http --upstream-protocol=http2 50051
Important: Keep this terminal open while testing!
Save Your ngrok URL
ngrok displays output like:
Forwarding https://abc123def456.ngrok-free.app -> http://localhost:50051
Your public URL is: https://abc123def456.ngrok-free.app
Save this URL - you'll use it in Steps 4 and 5:
- In Step 4 (Gateway JWT config):
https://abc123def456.ngrok-free.app - In Step 5.2 (Service App domain):
abc123def456.ngrok-free.app(domain only) - In Step 5.3 (BYoDS registration):
https://abc123def456.ngrok-free.app
ngrok Tips:
- Free tier URL changes each time you restart ngrok
- Monitor requests at
http://localhost:4040(ngrok dashboard) - Keep the terminal running - don't close it during testing
Option 2: Production Hosting
For production deployments, use a permanent domain with HTTPS.
Requirements:
- Public domain name (e.g.,
byova-gateway.yourcompany.com) - HTTPS/TLS certificate (Let's Encrypt or commercial CA)
- Reverse proxy or load balancer routing to port 50051
- Firewall rules allowing inbound HTTPS (port 443)
Hosting Options:
- Cloud VM (AWS EC2, Azure VM, Google Compute Engine)
- Container platform (Kubernetes, ECS, Cloud Run)
- On-premises server with public IP
Your URL format: https://byova-gateway.yourcompany.com
Setup Requirements:
- Configure reverse proxy/load balancer to forward to backend port 50051
- Install valid TLS certificate
- Configure DNS A/CNAME record
What's Next?
Now that you have your public URL, you'll use it in:
- Step 4: Configure gateway JWT authentication
- Step 5: Register with Webex Contact Center via BYODS
Remember: Use the same URL format everywhere - no port numbers!
anchorStep 4: Configuring the BYOVA Gateway
anchor4.1 Clone and Set Up the Gateway
Clone the Repository
git clone https://github.com/webex/webex-byova-gateway-python.git
cd webex-byova-gateway-python
Create Virtual Environment
# Create virtual environment
python -m venv venv

# Activate virtual environment (REQUIRED)
# On macOS/Linux:
source venv/bin/activate
# On Windows:
# venv\Scripts\activate

# Verify activation - you should see (venv) in your prompt
which python  # Should show path to venv/bin/python
Install Dependencies
pip install -r requirements.txtGenerate gRPC Stubs
python -m grpc_tools.protoc -I./proto --python_out=src/generated --grpc_python_out=src/generated proto/*.proto
4.2 Configure AWS Lex Connector
Set AWS Credentials
# Set environment variables (recommended for production)
export AWS_ACCESS_KEY_ID=your_access_key_here
export AWS_SECRET_ACCESS_KEY=your_secret_key_here
export AWS_DEFAULT_REGION=us-east-1
Configure JWT Validation
JWT validation secures communication with Webex Contact Center. Configure it with your public URL from Step 3.
Edit
config/config.yamland add/update the JWT section:# JWT validation configuration for gRPC requests jwt_validation: # Enable JWT validation (required for production) enabled: true # Enforce validation - set false only for initial testing enforce_validation: true # Your public URL from Step 3 (no port number!) # This MUST exactly match your BYoDS registration in Step 5.3 # # Examples: # ngrok: https://abc123def456.ngrok-free.app # production: https://byova-gateway.yourcompany.com datasource_url: "https://YOUR_PUBLIC_URL_FROM_STEP_3" # Standard BYOVA schema UUID (do not change) datasource_schema_uuid: "5397013b-7920-4ffc-807c-e8a3e0a18f43" # Public key cache duration cache_duration_minutes: 60Critical URL Matching Rule:
- The
datasource_urlhere must EXACTLY match your BYoDS registration (Step 5.3) - Use the same URL in both places - no port number needed
- Example:
https://abc123.ngrok-free.app(nothttps://abc123.ngrok-free.app:50051)
For Development/Testing Only:
jwt_validation:
  enabled: false  # Disable JWT temporarily for local testing
⚠️ Warning: Never disable JWT in production!
- The
Update Configuration File
Edit
config/config.yaml:# Gateway settings gateway: host: "0.0.0.0" port: 50051 # JWT validation configuration jwt_validation: enabled: true enforce_validation: true # Your public URL from Step 3 (no port!) datasource_url: "https://YOUR_PUBLIC_URL" datasource_schema_uuid: "5397013b-7920-4ffc-807c-e8a3e0a18f43" cache_duration_minutes: 60 # Monitoring interface monitoring: enabled: true host: "0.0.0.0" port: 8080 # Connectors connectors: # AWS Lex Connector aws_lex_connector: type: "aws_lex_connector" class: "AWSLexConnector" module: "connectors.aws_lex_connector" config: region_name: "us-east-1" # Your AWS region # Initial trigger text sent when starting a conversation (default: "hello") # For Bedrock agents, use a simple greeting rather than a specific request # to avoid triggering function calls before the agent is ready initial_trigger_text: "hello" barge_in_enabled: false audio_logging: enabled: true output_dir: "logs/audio_recordings" filename_format: "{conversation_id}_{timestamp}_{source}.wav" log_all_audio: true max_file_size: 10485760 sample_rate: 8000 bit_depth: 8 channels: 1 encoding: "ulaw" agents: []
4.3 Start the Gateway
Start the Server
# Ensure virtual environment is activated
source venv/bin/activate

# Start the gateway
python main.py
Verify Startup
- You should see output indicating both gRPC and web servers are running
- Check the monitoring interface at
http://localhost:8080
Test Gateway Status
# Test the API
curl http://localhost:8080/api/status

# Check available agents
curl http://localhost:8080/api/agents
anchorStep 5: Configuring BYOVA and BYODS
anchor5.1 Understanding BYOVA and BYODS
- BYOVA (Bring Your Own Virtual Agent): Allows you to integrate external AI services as virtual agents
- BYODS (Bring Your Own Data Source): Enables integration with external data sources for enhanced AI capabilities
- BYOVA builds on top of the BYODS framework
- Provides secure, standardized data exchange between Webex and third-party providers
- Uses JWS (JSON Web Signature) tokens for authentication
- Requires Service App creation and admin authorization
Important: BYOVA requires BYODS setup first, as the virtual agent configuration depends on having a registered data source.
5.2 Create a Service App for BYODS
Before configuring BYOVA, we need to set up a Service App for data source integration, as BYOVA builds on top of the BYODS (Bring Your Own Data Source) framework.
Prerequisite: You need your public URL from Step 3 for the domain configuration.
Navigate to Webex Developer Portal
- Go to developer.webex.com
- Sign in with your Webex account
Create a New Service App
- Go to My Apps → Create a New App
- Choose Service App as the application type
Configure the Service App
- App Name:
BYOVA Gateway Service App(or your preferred name) - Icon: Choose a suitable icon for your app or upload your own
- Description: Enter a brief description of your app
- Contact Email: Enter your admin email address
- Scopes: Ensure you select:
spark-admin:datasource_readspark-admin:datasource_write
- Domains: Enter your gateway domain from Step 3
- Format: Domain only (no
https://or port) - ngrok example:
abc123def456.ngrok-free.app - Production example:
byova-gateway.yourcompany.com - ✅ Correct:
abc123.ngrok-free.app - ❌ Wrong:
https://abc123.ngrok-free.app - ❌ Wrong:
abc123.ngrok-free.app:50051
- Format: Domain only (no
- Data Exchange Schema: Select
VA_service_schemafor voice virtual agent interactions- This schema (ID:
5397013b-7920-4ffc-807c-e8a3e0a18f43) is specifically designed for voice virtual agent services - Reference: VoiceVirtualAgent Schema
- This schema (ID:
- Complete any other required information
- App Name:
Save the Service App Client ID and Client Secret
- Under Authentication, locate the Client ID and Client Secret
- Save these credentials for later use
Submit for Admin Approval
- In your sandbox, select "Request Admin Approval"
- This makes the Service App visible in Control Hub for admin authorization
5.3 Register Your Data Source
Get Admin Authorization
- In Control Hub (admin.webex.com), navigate to Apps → Service Apps
- Find your Service App and click "Authorize"
- This generates org-specific access and refresh tokens
Get Service App Token
- After admin approval, return to developer.webex.com
- Go to My Apps and select your Service App
- Under Org Authorizations, locate your org in the list and select it
- Paste the Client Secret from step 1 into the Client Secret field and click "Generate Tokens"
- Save the returned
access_token- you'll need it to register your data source - Note: Tokens expire and will need to be refreshed using the refresh token provided
Register the Data Source
Use the access token from step 2 to register your data source with the BYoDS API.
API Reference: Register a Data Source
Request body:
{
  "schemaId": "5397013b-7920-4ffc-807c-e8a3e0a18f43",
  "url": "https://YOUR_PUBLIC_URL",
  "audience": "BYOVAGateway",
  "subject": "callAudioData",
  "nonce": "123456",
  "tokenLifetimeMinutes": "1440"
}
Critical - URL Matching:
- The
urlfield MUST exactly matchjwt_validation.datasource_urlfrom Step 4.2 - Use the same format:
https://your-domain(no port number) - Examples:
- ngrok:
https://abc123def456.ngrok-free.app - production:
https://byova-gateway.yourcompany.com
- ngrok:
Common Mistakes (all cause JWT validation to fail):
- ❌ Gateway config:
https://example.com/ BYoDS:https://example.com:443 - ❌ Gateway config:
https://example.com/ BYoDS:https://example.com:50051 - ✅ Gateway config:
https://example.com/ BYoDS:https://example.com
After registration:
- Save the
datasource IDfrom the API response - You'll use this in the next section (5.4)
- The
Reference: For detailed BYODS setup instructions, see the Bring Your Own Data Source documentation.
5.4 Configure BYOVA Virtual Agent
Navigate to Virtual Agents
- In Control Hub, go to Contact Center → Integrations → Features
- Click "Create Feature"
Configure Virtual Agent Settings
- Name:
AWS Lex Virtual Agent - Type of Connector: Select "Service App"
- Authorized Service App: Select your Service App from step 5.2
- Resource Identifier: Enter the datasource ID you saved in step 5.3
- Click "Create"
- Name:
anchorStep 6: Import and Configure Flow
anchor6.1 Import the BYOVA Flow Template
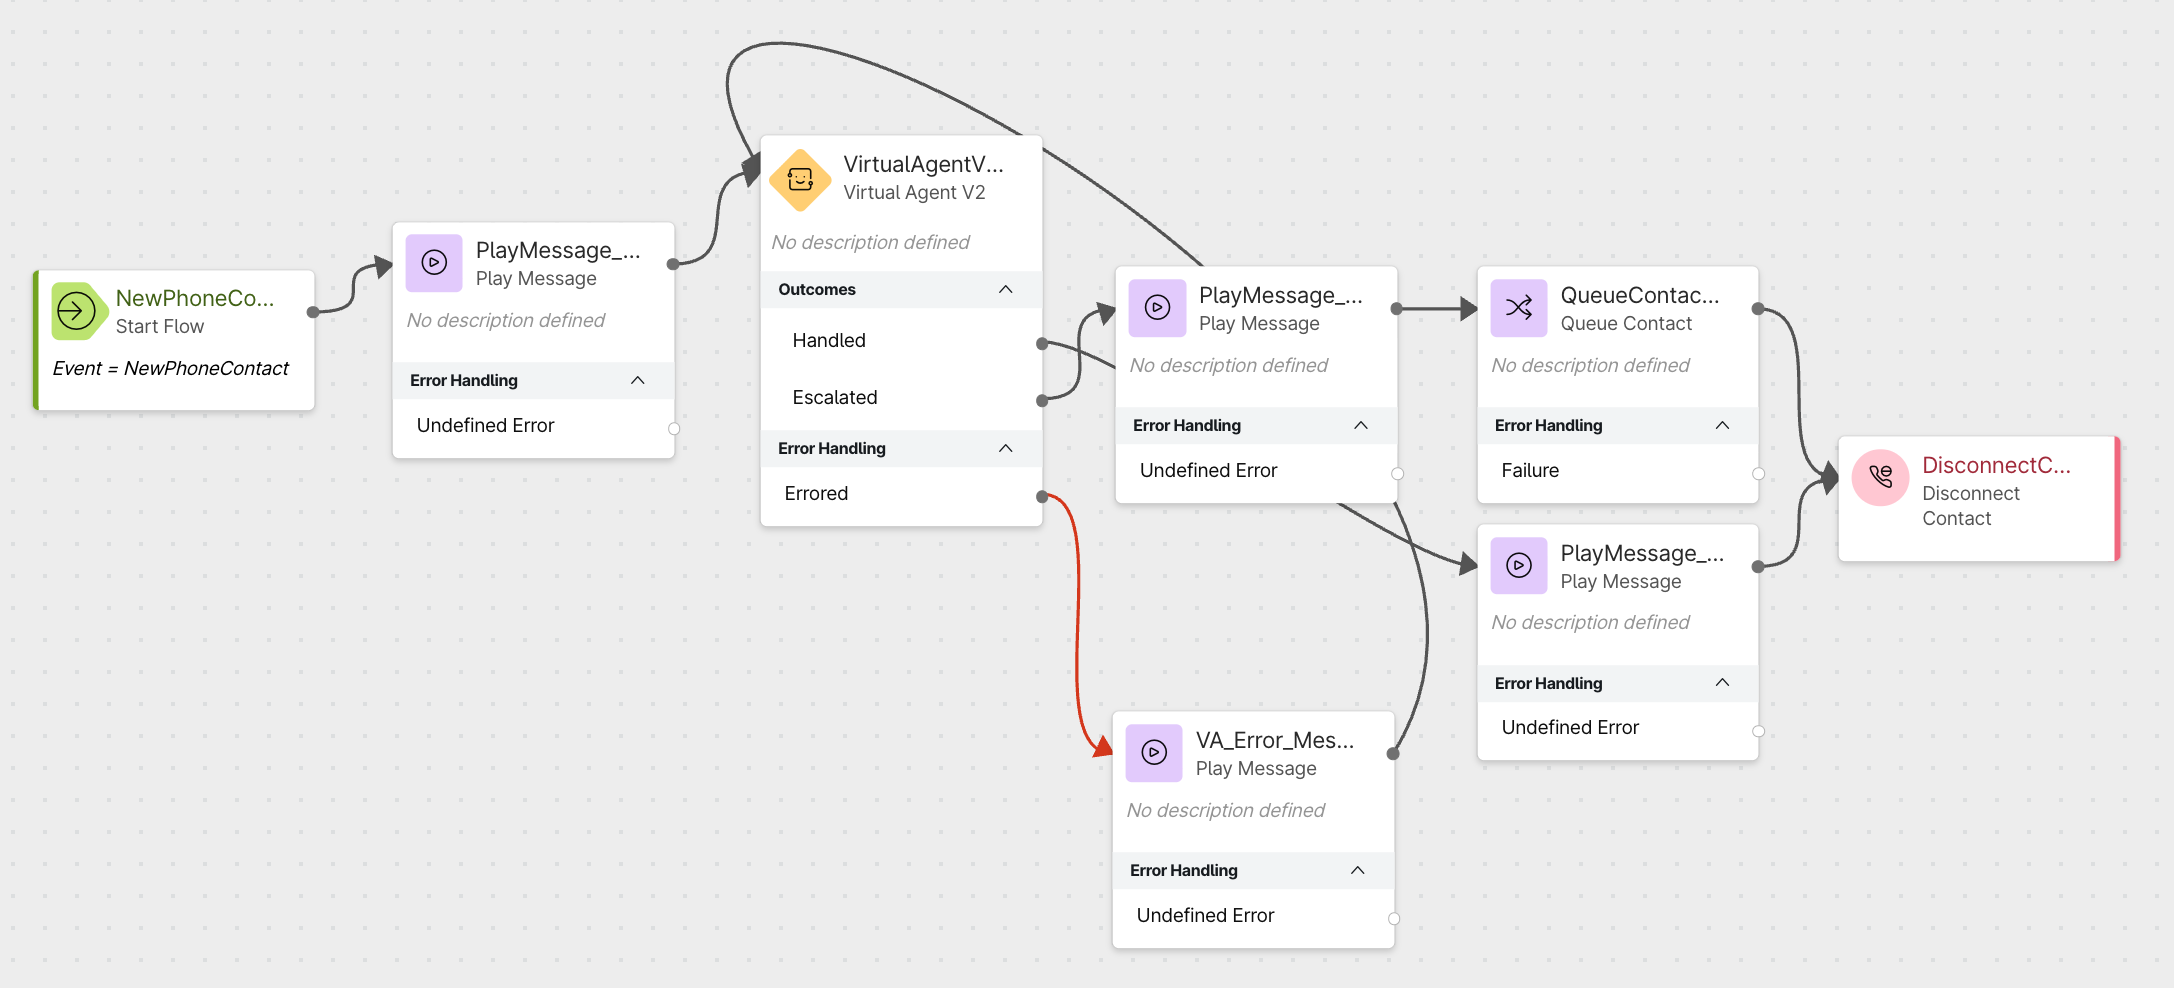
Navigate to Control Hub
- Go to https://admin.webex.com/login
- Sign in with your administrator credentials from the provisioning email
Access Contact Center Flows
- In Control Hub, navigate to Contact Center
- Click on Flows
- Select Manage Flows
- Click Import Flow
Reference: For detailed information about Flow Designer and flow management, see the Build and manage flows with Flow Designer documentation.
Import the BYOVA Flow Template
- Download the
BYOVA_Gateway_Flow.jsonfile from the gateway repository - In the import dialog, choose the
BYOVA_Gateway_Flow.jsonfile - The flow will be imported with the name "BYOVA"
- Download the
Configure the Virtual Agent
- In the imported flow, locate the VirtualAgentV2_q2c activity
- Click on the activity to open its properties
- Update the Virtual Agent selection:
- Connector Name: Select your BYOVA connector (e.g., "AWS Lex Connector")
- Virtual Agent ID: Select your configured virtual agent
- Save the activity configuration
Review Flow Structure
The imported flow includes:
- Start: Entry point for calls
- Virtual Agent: Routes to your BYOVA virtual agent
- Decision Logic: Handles agent disconnection and transfer scenarios
- Play Message: Provides feedback to callers
- End: Terminates the call
Save and Activate the Flow
- Save your flow configuration
- Activate the flow for testing
6.2 Assign Flow to Entry Point
Navigate to Channels
- In Control Hub, go to Contact Center → Channels
- Select Entry Point 1 (or your configured entry point)
Configure Entry Point Routing
- In the Entry Point 1 configuration, locate the Routing Flow setting
- Change the routing flow from the default to your BYOVA flow
- Save the configuration
Verify Assignment
- Confirm that Entry Point 1 is now using the BYOVA flow
- The entry point will now route calls through your virtual agent integration
anchorStep 7: Testing Your Integration
anchor7.1 Set Up Agent Desktop
Install Webex Contact Center Desktop
- Download from the Administrator Portal
- Install on a test machine
Log in as Agent
- Use the Premium Agent credentials from your provisioning email
- Enter the extension number (1001)
Set Agent Status to Available
- Ensure the agent is ready to receive calls
7.2 Test the Voice AI Integration
Make a Test Call
- Call the entrypoint number from your provisioning email
- You should hear the default greeting
Interact with the Virtual Agent
- Speak naturally to test your AWS Lex bot
- Try various utterances you configured
- Test the conversation flow
Test Agent Transfer
- Request to speak to a human agent
- Verify the call transfers to your logged-in agent
7.3 Monitor the Integration
Use the Monitoring Interface
- Open
http://localhost:8080in your browser - Monitor active connections and session data
- Open
Check Logs
- Review gateway logs for any errors
- Check AWS CloudWatch logs for Lex activity
Verify Audio Quality
- Test audio clarity and response times
- Check audio recordings in
logs/audio_recordings/
anchorTroubleshooting
anchorCommon Issues and Solutions
Gateway Startup Issues
Problem: Gateway fails to start - "datasource_url not configured"
Cause: JWT validation enabled but no datasource URL set
Solution:
Verify Step 3 is complete (you have a public URL)
Edit
config/config.yaml:jwt_validation: enabled: true datasource_url: "https://your-public-url" # No port!Or temporarily disable for testing:
jwt_validation:
  enabled: false
Problem: Gateway fails to start - dependency errors
Solution:
# Ensure virtual environment is activated
source venv/bin/activate

# Reinstall dependencies
pip install -r requirements.txt
1. Gateway Won't Start
Problem: python: command not found or import errors
Solution: Ensure virtual environment is activated
source venv/bin/activate
which python  # Should show venv path
JWT Authentication Issues
Problem: "JWT validation failed: datasource URL mismatch"
Cause: URL in gateway config doesn't match BYoDS registration
Solution:
Check your BYoDS datasource registration (Step 5.3)
Copy the EXACT URL you registered (including
https://, no port)Update
config/config.yamlto match:jwt_validation: datasource_url: "https://abc123.ngrok-free.app" # Must match BYoDS exactlyRestart gateway
Debug command:
# View your registered datasource
curl -H "Authorization: Bearer YOUR_TOKEN" \
  https://webexapis.com/v1/datasources/YOUR_DATASOURCE_ID
Problem: "Invalid issuer" in JWT logs
Cause: JWT from unsupported or malformed issuer
Solution:
- Verify BYOVA is enabled for your org (Step 1.4)
- Check datasource configuration in WxCC Control Hub
- Supported issuers:
https://idbrokerbts.webex.com/idb(BTS US)https://idbrokerbts-eu.webex.com/idb(BTS EU)https://idbroker.webex.com/idb(Production US)https://idbroker-eu.webex.com/idb(Production EU)https://idbroker-b-us.webex.com/idb(B-US)https://idbroker-ca.webex.com/idb(Canada)
Additional Resources:
URL Configuration Issues
Problem: Service App registration fails
Solution: Verify domain format
- ✅ Correct:
abc123.ngrok-free.app - ❌ Wrong:
https://abc123.ngrok-free.app - ❌ Wrong:
abc123.ngrok-free.app:50051
Problem: Webex can't reach gateway
Solution:
- Verify ngrok is running:
curl http://localhost:4040/api/tunnels - Check gateway is listening:
curl http://localhost:8080/health - Test public URL:
curl https://your-ngrok-url/health - Verify URL matches in:
- BYoDS registration (Step 5.3)
- Gateway JWT config (Step 4.2)
2. AWS Lex Connection Issues
Problem: Authentication or region errors Solution: Verify AWS credentials and region
aws sts get-caller-identity # Test AWS credentials
3. Webex Contact Center Can't Reach Gateway
Problem: Connection timeout or refused
Solution: Check network configuration
- Verify gateway IP address
- Ensure port 50051 is accessible
- Check firewall settings
4. Audio Quality Issues
Problem: Poor audio quality or delays
Solution: Check audio configuration
- Verify sample rate (8000 Hz)
- Check encoding (u-law)
- Review network latency
5. Bot Not Responding
Problem: Lex bot doesn't respond to utterances
Solution: Check bot configuration
- Verify bot alias ID
- Test bot in Lex console
- Check intent configuration
Debug Commands
# Check gateway status
curl http://localhost:8080/api/status

# View active connections
curl http://localhost:8080/api/connections

# Check debug information
curl http://localhost:8080/api/debug/sessions

# Test AWS credentials
aws sts get-caller-identity

# Check Lex bot status
aws lex-models-v2 describe-bot --bot-id YOUR_BOT_ID
anchorNext Steps
anchorEnhance Your Integration
Add Advanced Features
- Implement sentiment analysis
- Add multi-language support
- Integrate with CRM systems
Scale Your Solution
- Deploy to production AWS environment
- Implement load balancing
- Add monitoring and alerting
Customize the Gateway
- Add new connector types
- Implement custom audio processing
- Add advanced logging and analytics
Production Considerations
Security
- Use IAM roles instead of access keys
- Implement proper authentication
- Encrypt sensitive data
Monitoring
- Set up CloudWatch alarms
- Implement health checks
- Add performance metrics
Scalability
- Use auto-scaling groups
- Implement load balancing
- Plan for high availability
anchorConclusion
anchorYou've successfully set up a complete voice AI integration using Webex Contact Center BYOVA and AWS Lex! This powerful combination allows you to:
- Provide 24/7 intelligent customer service with AI-powered virtual agents
- Seamlessly transfer complex inquiries to human agents when needed
- Scale your contact center without proportional increases in staff
- Improve customer satisfaction with faster response times and consistent service
The BYOVA Gateway provides a flexible foundation that you can extend and customize for your specific needs. Whether you're building a simple FAQ bot or a complex conversational AI system, this architecture gives you the tools to succeed.
Resources
Support
For questions about this integration:
- Check the troubleshooting section above
- Review the gateway logs and monitoring interface
- Consult the AWS Lex and Webex Contact Center documentation
- Reach out to the developer community for assistance
Happy building! 🚀
This guide provides a comprehensive walkthrough for integrating AWS Lex with Webex Contact Center using the BYOVA Gateway. The setup process is designed to be developer-friendly while following enterprise best practices for security and scalability.